New in version 5.5
New! QuickBooks 2011 Support
QuickBooks Link was updated and now supports QuickBooks 2011 (Pro, Premier and Enterprise).
==> Read more about QuickBooks Link
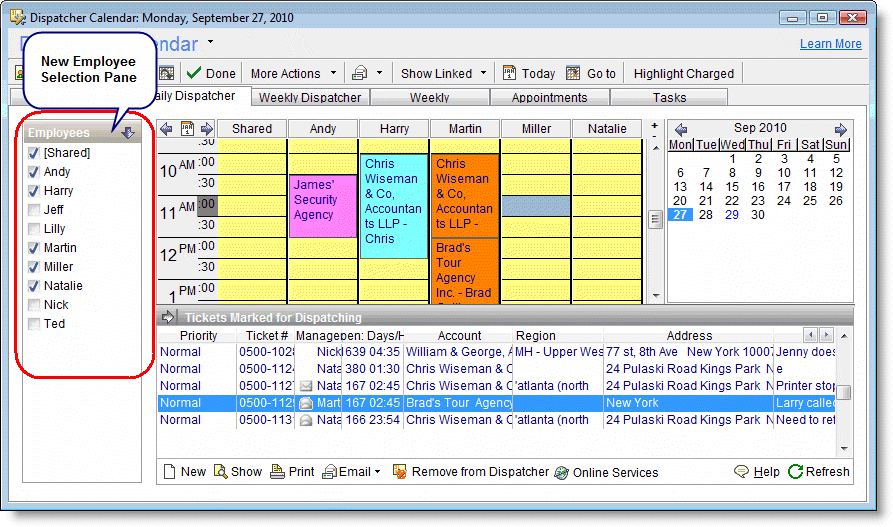
New! Employee Selection Pane in Calendar
A new Employee Selection pane was added to the Calendar. This new pane provides an easy way to choose the employees you want to view in the Calendar or Dispatcher simply by selecting the employees in the list.
The new Employee Selection pane replaces the previous way to filter employees in the calendar, and there is no need now to click the magnifying glass to see which employees are being displayed. The Employee list is displayed right next to the calendar and lets you easily choose which employees to show.
Saving the windows configuration (from the Windows menu) saves the currently selected employees so next time you login to the system you will get the same view.
click to enlarge
</br/>
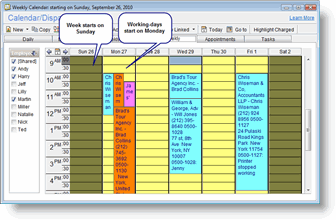
New! Weekly Dispatcher
The Dispatcher window now provides a new Weekly Dispatcher view. The Weekly Dispatcher displays a specific Employee’s weekly calendar together with the list of Tickets waiting to be dispatched in the bottom pane. This way you can easily drag a Ticket to dispatch it while viewing the employee’s whole week activity.
Using the Weekly Dispatcher you can easily switch between employees and see a weekly view of their calendars to find available resources.
To work with the weekly Dispatcher, click the Weekly Dispatcher tab in the Dispatcher window.
To set the weekly view as the default view for the Dispatcher, go to Tools > Options > Calendar and set the Default Dispatcher View.
click to enlarge
Enhanced Calendar Work Days Display
You can now select which day will appear on the left most column of the calendar (in Weekly and Monthly views) regardless of the working-days settings.
click to enlarge
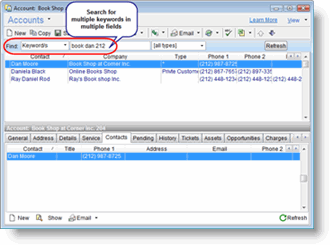
New powerful Account Search Option
The new Account Search helps you find Accounts much faster. Searching for Accounts by Keywords now lets you search by multiple words, providing you with powerful search capabilities. The Keywords search searches for Accounts in multiple fields, such as the phone numbers, address, contact name, and more.
To search for Accounts, simply use the Keyword search in the Accounts search pane, and type the words you wish to search by. For example, type a keyword you remember from the Company name, together with a name you remember from the Contact name, together with an additional keyword, say a phone prefix and run the search. The CRM module will then search for the words in multiple fields and will display all Accounts that match the criteria.
click to enlarge
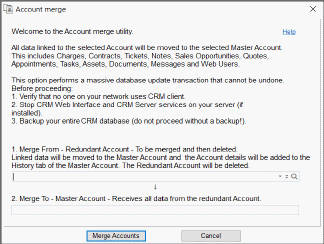
New! Account Merge
The new Account Merge tool is now available. The Account Merge lets you merge data from two Accounts into a single Account. This powerful tool finds all data related to the duplicate Accounts, such as Tickets, Charges, Contracts, History Notes, and so on, and merges them into the main Master Account. All the merge details are logged in a History Note which is added automatically to the remaining Account.
This helpful tool, which has been requested by many users, can help you when the same customer is entered into the system twice by mistake and you wish to combine all the data and leave only a single Account for the customer to avoid mistakes.
To use the Account Merge tool, close all application windows within the app. Then activate it from Tools > Data Tools > Account Merge. Note that this action is irreversible so make sure to backup your database before using this tool.
This tool merges only the data linked to the Account. Other Account details (such as phone numbers, address) remain the same for the remaining Account. Details of the other Account can be found in the Merge History Note.
click to enlarge
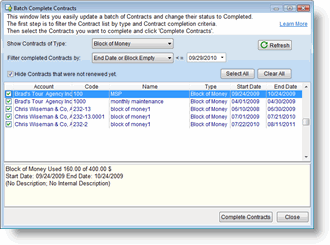
New! Batch Complete Contracts
The Batch Complete Contracts tool completes a group of selected Contracts. Use this option to complete Contracts that have expired. You filter the Contracts, either by their End Date or Block Empty.
To run the utility, use the following menu option from the main Contracts window: Contracts > Batch Complete Contracts.
click to enlarge
==> Read more about Batch Complete Contracts
New! Web Interface: Customer Privilege Groups
Customer Web Users can now be assigned to a specific privilege group, allowing you to control which information each customer user can see and update when using the Web portal.
The Customer Privilege Groups can be managed from File > Users & Privileges > Customer Privileges – Web Users. Each Customer Web User is assigned to a privileges group.
The system comes with 3 predefined fixed system groups (Full, Partial and Limited). New groups can be added and customized to your specific needs.
Note: When upgrading to version 5.5, your customers will have the same access as before. The upgrade program creates a new custom group automatically, based on the current Web Interface customer privileges settings defined under Tools > Options > Web Interface. This custom group is automatically assigned to all customer Web users and becomes the default group for new customer users.

click to enlarge
==> Read more about Customer Privileges
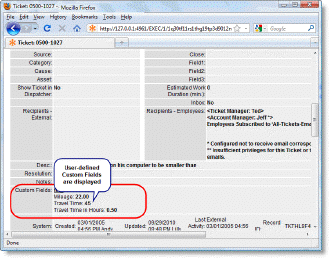
Web Interface: Show User-Defined Custom Fields
Employees can now see custom fields when using the Web Interface, providing you access to valuable information stored in these fields, even when you are out of the office, using the Web Interface. For example, if you add custom fields to Assets to hold IP addresses, special notes, passwords, etc. they will now be displayed to technicians when on-site via the Web Interface.
User-defined fields are displayed (read-only) in the relevant entity page (Account, Ticket, Asset, etc.) under the rest of the general details. User-defined fields can be edited only when using the CRM Windows client application, and when using the Web Interface, they will be displayed with their values.
click to enlarge
Web Interface: Login opens in the same Browser
When logging in to the Web Interface via a Browser, the session is now created in the current browser window or tab. This makes the login process simpler and quicker. Using the same window also makes the process smoother when using the Web Interface on mobile devices.
Web Interface: Account Popup
The Account Popup Message, which appears (if defined) when viewing or choosing the Account anywhere in the application, now appears also when working via the Web Interface.
==> Read more about Account Popup
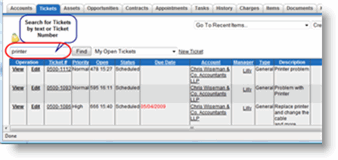
Web Interface: Enhanced Ticket Search
The Ticket search in the Employee Web Interface was enhanced and provides more powerful search options. You can now search for Tickets by Ticket Number or by text/phrase in the Description, Resolution, and Notes fields.
To use the new Search options, simply type-in the phrase to search in the search box from the main Tickets page in the Web Interface.
click to enlarge
Web interface: Link Customer Tickets to Secondary Contacts
When a Customer user opens a new Ticket or adds a History Note via the Customer Web Portal, the Ticket or History Note are now linked to the Secondary Contact defined for this Customer Web User. Linking to the Secondary Contact (if defined for the Web User) replaces previous behavior where the link was created to the Account’s Primary contact.
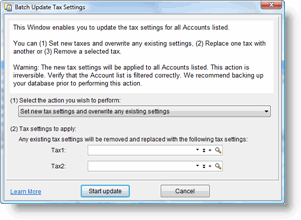
New! Batch Update Account Tax Settings
Starting with version 5.5, a new tool utility was added to the Accounts menu, called Batch Update Tax Settings. This utility allows updating the Tax fields’ settings for many Accounts at once.
The new Batch Update Tax Settings utility lets you set the Tax fields settings for a list of Accounts, either by setting completely new tax settings, removing a tax code, or replacing a certain tax code settings with another.
To activate the utility, open the main Accounts window and select the Accounts > Tools > Batch Update Tax Settings menu option.
click to enlarge
“Hello <‘first-name’>,” – Contact’s First Name in Email Templates
When adding data to Email Templates it is now possible to add the First Name of the Contact (rather than user the First and Last name together). This makes email more personal as you can start the email with “Hello X,” using the first name.
The First name is taken from the contact’s name, using the first word of the full Contact name. For example, for a contact called “John Doe”, the First Name in the email template will appear as “John”.
Ticket Contact in the Dispatcher
When viewing the Ticket list in the Dispatcher window, the Ticket’s Contact is now displayed in the list, making it easy to see to which Contact the Tickets in the Dispatcher are related to.
Asset Emails are sent to Contact Linked to the Asset
Sending an email from the Assets window now sends the email to the Contact’s email address defined in the Contact Email field. Note that the email is now sent to the email defined for the Contact which is linked to the Asset. If this Contact does not have an email address defined, or if the Asset is linked to the Account’s main contact, the email will be sent to the primary email address of the Account.
Control Ticket Estimated Work Duration’s Default Value
The Ticket Estimated Work Duration field lets you estimate how much time is required for resolving the Ticket. This value is used when dispatching the Ticket, to determine the dispatched appointment duration.
Starting with version 5.5 it is now possible to change the default value for this field for new Tickets.
The default value for the Ticket Estimated Work Duration is managed from Tools > Options > Tickets (Admin), and can be modified only by system administrators.
Overlapping Text Fixes
Overlapping text displaying audit information (e.g. created by, updated by, etc.) in some windows was fixed and now shows smaller text and trims the text in case it is too long. This provides nicer display and much clearer details in places where long text is displayed.
Charge Reports performance Enhancements
Charge reports which require large database queries and analysis were improved and now run much faster.
API Enhancements – Read Data without Using ODBC
The API has been enhanced. A new set of API tools were added allowing third-party programs to query and read data from the PSA’s database without using ODBC. This enhancement replaces the need to use ODBC in order to read data from the software database. It means that configuring and deploying programs you write using the API is now much easier. No ODBC installation or configuration is required.
Using the new API rather than accessing the database directly via ODBC makes the access safer and more efficient.
ODBC access is still, and will continue to be, supported. ODBC should be used in cases when you need access to the database and do not want to write code for this. For example, when using third-party reporting tools it is more likely that you will use ODBC rather than embedding your custom source code for this.
The way it works is that a new set of API functions were added which let you define a filter, i.e. a database query and retrieve results. The functions runs against the PSA database directly.