New in version 6.0
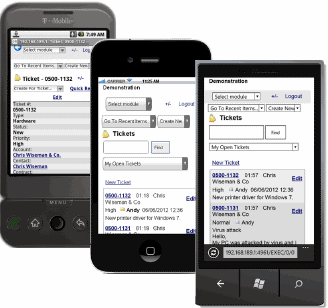
New! Web Interface – New Web Design for Mobile Devices
Easily manage your business from your mobile device! The Web Interface is now optimized for mobile devices with small displays. It is now easier than ever to be on top of your tasks on the go. Easily view and manage tickets, get customer contact details, log time and parts charges and much more directly from your phone. The Web interface has gone through a complete redesign to properly support mobile devices and small screens.
Additional new options for mobile devices:
- All HTML templates where adjusted to fit mobile screen resolution (minimum screen width 320 pixels).
- Instead of the existing tabs (i.e. Account/Tickets etc.), a quick selection list will switch between these tabs.
- Users can adjust the amount of characters to make long textual fields look better on mobile devices. To make the adjustment go to Tools > Options > Web Interface.
- It is possible to switch to mobile display also on any browser using the new switch to mobile / switch to standard option.
click to enlarge
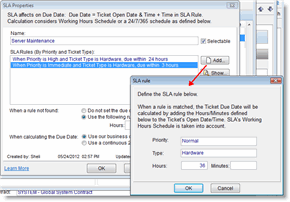
New! Service-Level Agreements (SLA) Support
The new SLA feature, as part of the support desk module, provides an easy way to manage Service-Level Agreements (SLA) to provide services to your customers within the time frame agreed with them and apply them on Tickets automatically.
When using SLAs in the PSA you “teach” the app the maximum response times agreed with the customer to handle and resolve different problems, and the app will do the rest. In order to “teach” the system you simply define rules for automatic calculation of the maximum delivery time, which in turn, will automatically determine the Due Date for your Tickets.
SLA Due Date calculations take into account your actual working hours, as defined in the new customizable Working Hours Schedule feature. Holidays? Scheduled days-off? Closed every Friday on 03:00 PM? No worries, all is taken into account.
SLAs can be linked to Accounts or Contracts, thus automatically applied to Tickets created under the Account or Contract.
click to enlarge
==> Read more in SLAs User Guide
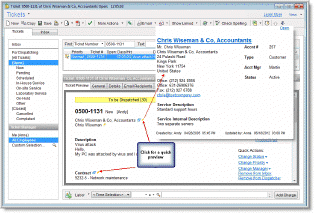
New! Quick Preview
Save time and clicks with this new powerful feature. Information is now just click away! A new quick-view option was added to all linked entities. The quick-view opens a Window with a convenient display showing a summary of the entity details. This option is available from many fields, such as a linked Account, Asset, Contracts, etc.
click to enlarge
New! Ticket Preview Pane in Dispatcher and Other Windows
The Dispatching Tickets to technicians has significantly become easier. A new Quick Preview Pane was added to the Dispatcher window, showing the selected Ticket Details in the same window! The pane can be displayed on the right or at the bottom part of the Ticket list. To control the display, click the Preview: button at the bottom part of the pane.
The New Ticket Preview option is also available in the Tickets tab of Accounts, Assets and Contracts.
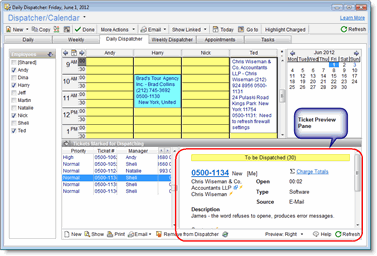
click to enlarge
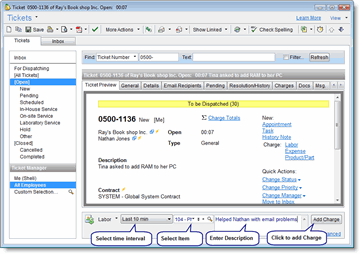
New! ‘Quick Charge’ Pane in the Ticket Window
Capture more billable time with fewer clicks! A new and powerful Quick Charge pane was added to the Ticket window. The Quick Charge option provides an easy way to add Charge entries directly from the Ticket Window without opening a separate New Charge window.
Adding a Charge using this option requires only selecting the Item, selecting the time interval from a predefined list and clicking Add. If needed, it is also possible to click Go Advanced to open the New Charge window as usually.
To streamline your work, all data entered in this pane is kept for subsequent Charges you need to add. Many times adding a new Charge will become a single click away!
The Quick Charge pane is also keyboard friendly and you can use the keyboard arrows and tabs in order move between the fields and select the values. Note that the Charge description field is enlarged when entering the description area, either by clicking it or using the Tab key, so you can conveniently enter the description.
click to enlarge
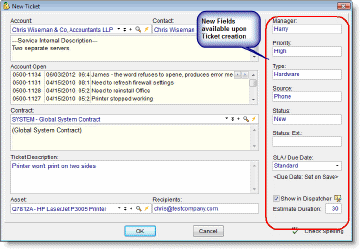
More Fields in ‘New Ticket’ Window
The New Ticket Window now includes additional fields to make the process of entering a new Ticket quicker and smoother.
New fields include:
- Status
- Due Date
- Priority
- Status
- Estimated Time Duration.
click to enlarge
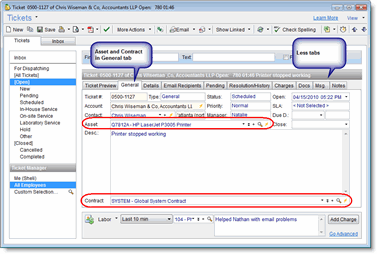
Ticket Details Window Changes
Ticket Window was simplified to include fewer tabs, making Ticket details available in fewer clicks. The Contract and Asset fields were moved to the General tab, where Asset is now located under the Contact field and the Contract appears below the Ticket description.
To view Contract and Asset details (and others), use the new Quick-View button located in the right part of the field, or the right-click > Show Linked… option.
click to enlarge
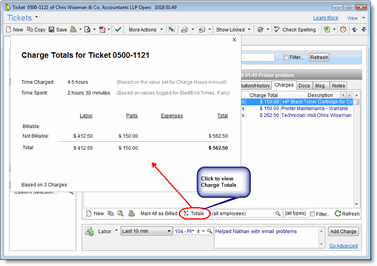
Charge Totals Available in Ticket Window
Quickly access the Ticket Charge Totals! The total time spent, time charged and total amounts for the ticket are now just one click away using the new Charge Totals feature.
A new ‘Charge Totals’ link is available under the Ticket Preview tab as well as in the Charges tab, and provides easy access to the total charge amounts, in a convenient display. The window appears as a quick popup Window showing the information in no-time.
This feature provides access to this valuable information without requiring printing reports in order to summarize the data. When filtering the Charges in the Charge window, the quick Charge Totals will show the filtered list information only.
click to enlarge
Ability to Disable No Resolution Warning for Tickets
Administrators can now choose how the application will behave when completing a Ticket with no resolution entered. It is now possible to disable this warning always, or disable it only if Charges are already logged for the Ticket.
To control the way the application behaves go to Tools > Options > Tickets (Admin) tab.
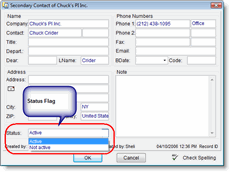
Not-Active Flag for Contacts
Easily hide old Contacts while still keeping your entire histories with them!
Secondary Contacts can now be marked as Active or Not-Active using a new flag in the Contact’s details window.
When a Contacts is set as Not-Active it will not be available in lists when attempting to selects a contact.
This powerful feature allows you to keep the complete history of all contacts for a certain customer, while removing them from the current activity.
To set a Contact as Inactive, open the Contact Details window > go to Status > Select Inactive.
click to enlarge
Batch Mark Charges as Billed
A new ‘Mark All Listed Billable Charges as Billed’ option is now available in Charges tabs. This option will mark all Billable Charges that appear in the list as billed.
This option is especially useful for users not working with QuickBooks that want to quickly batch update a bunch of Charges as billed.
Contact Code Appears in List
The Secondary Contact’s Code field is now available under the Contacts list when viewing the secondary Contacts tab under the Account. Having the Code in the list can help to easily track contacts by this field and perform actions like sorting the list by it.
Contact Appears in Document Lists
The Documents Window and lists now display the Contact’s column. This provides you with the knowledge to which contact the document is related to without having to open the Document properties.
‘Show Linked’ button on the Toolbar
A new ‘Show Linked’ button is now available on the toolbar, providing a very quick access to linked entities. This option will open linked entities for the currently open window.
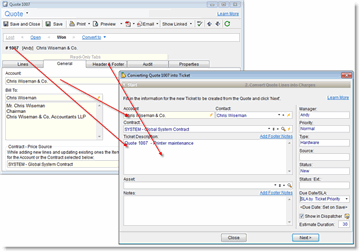
Quotes – Convert Quote to Ticket
Streamline your work by easily converting Won Quotes into service Tickets with automatically created Charges linked to the new Ticket!
After a Quote is accepted and set as Won, it can now be converted into a Ticket. Converting the Quote into a Ticket will also create billable charges from the Quote Lines and will attach the Charges to the Ticket.
Converting a Quote into a Ticket helps to streamline your work when winning a job, and allows you to easily move on to the operative part of the job, while keeping the information from the Quote.
click to enlarge
Quotes – Option to Refresh & Recalculate Taxes
A new option was added to the Quotes allowing to refresh the Quote with new settings and to recalculate the results. New settings may include updated Tax rates or updated Account or Item Tax settings.
The Refresh and Recalculate option goes over all Item Taxes, Account Taxes and Tax Rates and re-applies them to the Quote.
The new option is available from the Quotes main menu > ‘Refresh & Recalculate Taxes for Quote’. The option can be applied only on Quotes in status Open.
Quotes – Show Item Information
The Item Code and Item Type are now available in the Quote Report and can be added to reports when designing the report. The Item Code and Item Type will show the current values, regardless of what it was at the time of quoting.
QuickBooks – More Ticket Information Passed to Invoice
Let your customers see the Ticket/s Description and Resolution on your Invoice!
In addition to the vast amount of information that can already be included in the Quickbooks Invoice generated by the app, – including all Charge information and descriptions, you can now also include the Ticket Description and Resolution fields in your Invoice.
The Ticket Description and/or Resolution will show only once, even in cases where many Charges for this specific Ticket were converted into Invoice Lines.
==> Read more about QuickBooks Link
QuickBooks – Invoice Reference Number Available
Easily see to in which QuickBooks Invoice each Charge has been included in.
The QuickBooks Invoice Reference Number is now available in Charge lists and reports. When adding the QuickBooks Invoice Reference Number, Charges that were billed and are linked to a QuickBooks Invoice will display the equivalent Reference Number.
The QuickBooks Invoice Reference Number is available in lists under the ‘Invoice Ref’ column. To add the QuickBooks Reference Number to Charge Reports use the ‘Charges – Invoice Ref’ field.
Email Connector – Automatically Add Ticket Email Recipients
As part of the Email Connector email threading management, it now also offers the ability to automatically scan processed email message headers to find relevant email recipients (To and Cc) and automatically add them as Recipients in the relevant Ticket in your help desk.
Adding recipients is done in two levels:
- If the email addresses that are found in the header are employees, then are added to the Employee Recipients in the Ticket.
- Other email addresses are added as External Recipients in the Ticket.
Administrators can control whether the automatic scanning for email recipients is active via the ServerConfig > Email Connector tab > Advanced options.
Upgrade Note:
Users already working with the Email Connector will have this feature disabled by default. To activate the feature, visit the ServerConfig > Email Connector > Advanced options > General Settings > Automatically find and add Ticket Recipients. Then restart the CRM Server Windows service on your server.
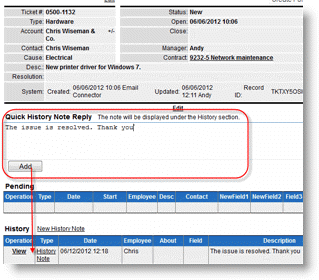
Web Interface – Discussions with Customers Made Easy – Quick History Note
You and your customers can now easily build a discussion thread under the Ticket. Customers and employees can now enjoy an easy interface for adding notes on Tickets.
Customers can now very easily add notes to Tickets directly from the Ticket details page simply by filling in their reply and clicking the ‘Add’ button. This does not require opening a new page or navigating outside of the Ticket window, and just saves time and makes the entire flow much friendlier.
Employee users can also add Quick History Notes use a quick window that opens in the Ticket window itself.
click to enlarge
Web Interface – Enhanced List View
Users can now control the amount of characters that will be displayed for long textual fields (Memo fields) showing up in lists. This new feature helps you manage the way you see the list, and the amount of data that will be displayed when showing long (Memo) fields.
In situations where the text is very long and exceeds the length you define, a linkable ‘…’ sign will appear at the end of the truncated text and this will open for viewing the full details for this entity.
Controlling the length of text to show in the lists can be defined separately for standard Web browsers and for the new mobile mode.
To define the length of long text in lists in the Web Interface, go to Tools > Options > Web Interface > Memo Fields Display Limits.
Web Users – Easily Send Web User Credentials to Customers
Streamline the process of providing your customers with Web user credentials to log into the Customer Web portal.
You can now easily send emails with account login credentials for customer Web users. The email can be formatted using Email Templates.
The default email template provided for this purpose includes the account credentials, including the username and password.
To send an email with the customer account login credentials, select the Web User you want to send to and click the Email icon at the bottom part of the Web User tab and choose the email template you want to send.
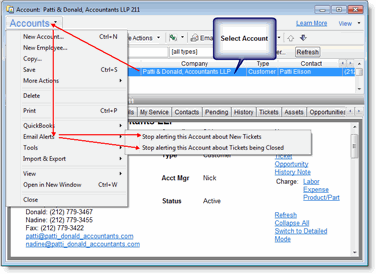
Alerts to Customers – Ability to Disable Alerts to Selected Accounts
Enjoy the automated email alerts to customers but need to disable it for specific customers?
To control the Alerts to Customers settings per Account, you can now open the Accounts Window, navigate to the specific Account and from Accounts > Email Alerts menu choose your preferences for the selected Account.
click to enlarge
Separate Charges and Contracts Options Tabs
The Charges and Contracts options tab (under the main Options Windows) was updated. New options were added to the Charges settings, mainly regarding the new Quick-Charge options. Contract options were moved to a separate tab in the Options Window. Options now include two separate tabs: Charges & Items tab and Contract tab.
Adding Graphical Logo to Reports Made Easy
Easily embed your graphical logo in pre-designed system reports.
Reports header can now be designed with your textual header (to include your company name, etc.) and your graphical logo from a single place, without customizing each report. The Report header is now defined once for all reports and can be edited from the Tools > Options > Reports tab.
When opening Tools > Options > Reports tab you will see that it now includes two tabs for the Header: Text and Image (usually your Logo). The image file can be displayed with, or instead of the textual header.
Upgrade Notes:
- When upgrading, the ‘Image’ option of the Report Header is disabled by default unless explicitly enabled and an image file is loaded.
- Reports that were already customized in the past to contain a logo by hiding the original Report header and adding the logo in a separate band (or in the Report content band itself) will not be affected by this feature.
- The new header design will affect only reports that display the original system Header band in the report.
click to enlarge
Allow to Close a Locked Session
A new ‘Close app’ option was added to the Lock Session screen. This option allows users to close the application even without entering the password of the user who locked the session.
If there are open unsaved windows in the locked running application, any user can click “Close app” and select Yes or No when asked whether to save changes. Application will always quit after this step.
Keyboard Scroll in Lists
The Keyboard’s up and down arrows are now enabled in all lists and tabs, allowing easy scrolling using your keyboard. The keyboard scroll support includes the Charges main list, Items window and Ticket selection list. This will help keyboard lovers to streamline their work even more.
Printing – Support for Printer Default Settings
Printing reports is now made simpler for previously non-supported printing devices. The system will now take, even for these devices, the default printer settings in regards to two side printing and the default printer tray.
Dual Monitor Support
Running the app on dual monitors has been significantly improved. When running on dual monitors, the app can now be used on the secondary monitor and everything will open on the correct monitor, including drop down menus, confirmation windows, hints, etc.
Note: This enhancement is included with this release and it is still marked as a Lab feature.
VPN Enhancements
Users that are already benefiting from using the PSA Windows client over a VPN conncetion (and the required SQL engine) will see a further performance enhancement. When logging into the app in configuration (executable files located locally on the user PC) users will now see the option to log into the app in ‘VPN’ mode just near the fields where the enter their user credentials. This option should be selected when connecting remotely over a VPN connection (e.g. Not when not when using the app at the office LAN). This new option will increase performance as all communication to/from the PSA client and the remote server will now be compressed, what normally results in much better performance, especially under slow connections.
Disclaimer: The software works best over VPN when being used over a remote session. While we have been continuously enhancing the performance of using the Windows client over VPN it is still not the recommended way to access the app remotely.
New! Native SSL Connection to Mail Servers (Lab)
It is now easy to connect the software to secure mail servers (POP3/SMTP) directly.
So far a mediator tool, called Stunnel, had to be installed and configured to achieve this.
With version 6.0 the Email Connector and Alerts Server modules can connect directly to SSL based mail servers.
* This feature is classified as a Lab feature.
API – Support Remote Access
The already powerful API libraries to our PSA software, have just been significantly enhanced to allow 3rd party programs to run from anywhere and still connect and integrate with PSA remotely over the http protocol. This allows developers to connect and use PSA’s APIs from hosted servers, remote networks, and more. This new capability opens the door for many new implementations.
For more information please contact us.
API – Support for Quotes (Libraries and Email API)
The API now supports add, update and delete Quotes and Quote Lines.
Performance enhancements
General over all performance enhancements were performed, including enhancements when managing and printing Tickets.
There’s More!
In addition to the features listed above, we’ve also made general bug fixes and performance enhancements.