New in version 8
*Scroll for download link
This release includes new features and options requested by our user community.
Please find detailed information about what’s new in this release.
To-do Lists have been integrated throughout the application.
- Easily add list of To-dos to Account/Ticket/Asset/Contract and more.
- Change the order of To-dos by drag and drop.
- Change the order of To-do Lists by drag and drop.
- Quickly charge one or all done To-dos at once.
- Create templates to quickly add common To-dos.
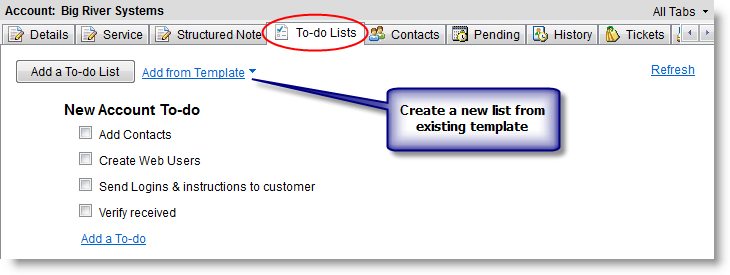
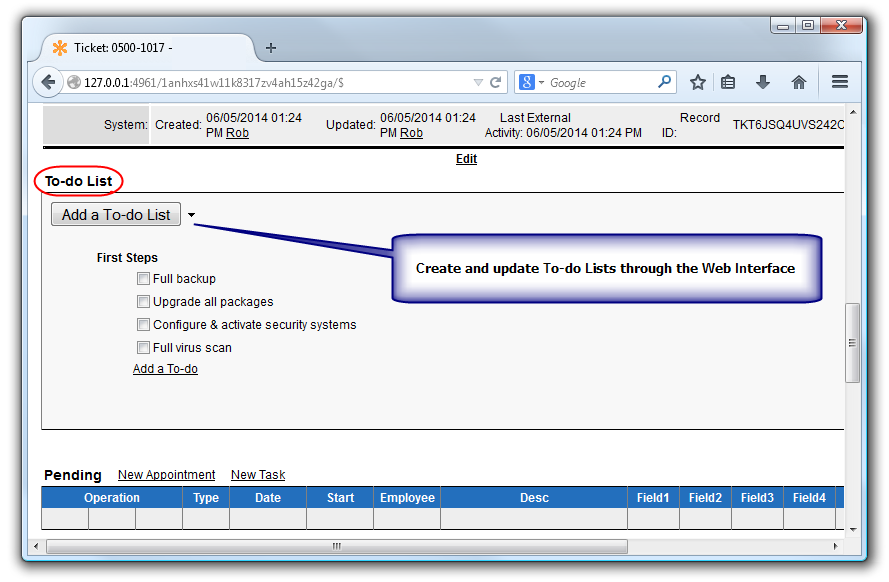
You can now create a To-do List in Accounts, Employees, Tickets, Contracts, Assets and Opportunities. In each of those windows you will see a new tab for To-do Lists where you can add a list on the specific record, such as a Ticket. You can even add multiple lists to each Ticket, Contract or other record type. All your To-do Lists will appear on the To-do List tab and there is also a section on the Preview tab which will indicate the number of currently open To-dos.
click to enlarge
Adding a list is very fast and you can save a list as a template, allowing you to rapidly create new lists with the same format. A list could contain a series of steps which should be performed on a new Asset, for example a server installation checklist which might say:
[ ] Connect network cable
[ ] Boot up/PXE install
[ ] Check connectivity
[ ] Label it
[ ] Add to monitoring
When working on an Account it could be a list of things to be done when a new customer is added:
[ ] Add Contacts
[ ] Create Web Users
[ ] Send Logins & instructions to customer
[ ] Verify received
When using a pre-made template this list of steps can quickly be applied to every new Asset, Ticket, Account etc. Each section has its own separate selection of To-dos so sales staff could have their sales related lists to apply to new opportunities while technicians have their tailored lists for tech related tasks.
When an item is marked as done, the system also stores which employee did it and displays their name next to the item in the completed items list, so if multiple employees are working on the same list you can quickly see who did what.
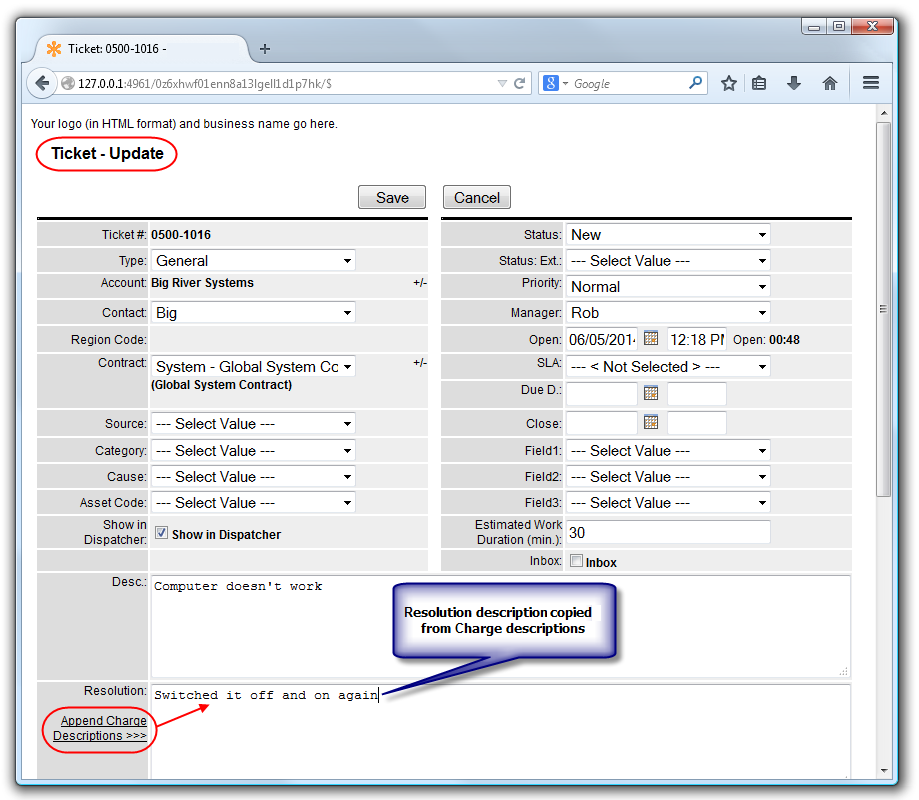
Charging To-dos: Once a To-do action is marked as done, or at any time afterwards, you can then also easily add a new Charge for that action or you can even add a Charge for all the done To-do actions at once, making it very simple to bill for all the work you do. The Charge description already contains the description copied from the To-do action/s.
You can easily change the order of Lists and items in a list by dragging and dropping the item or list. Items can also be dragged between lists.
To-do lists can also be added to Activity Templates and then automatically created when the Activity Template is applied. To add a To-do List to an Activity Template you must first create a To-do List template as described above and then after creating the Activity Template in the usual way you click New > To-do List Entry and then select the To-do List template to use.
Along with this feature there are now also new Reports which include the To-do Lists, such as “Asset Details Including Configuration Note, Pending, To-do and History” and “Expanded Ticket Details2”.
==> Read more about To-do Lists.
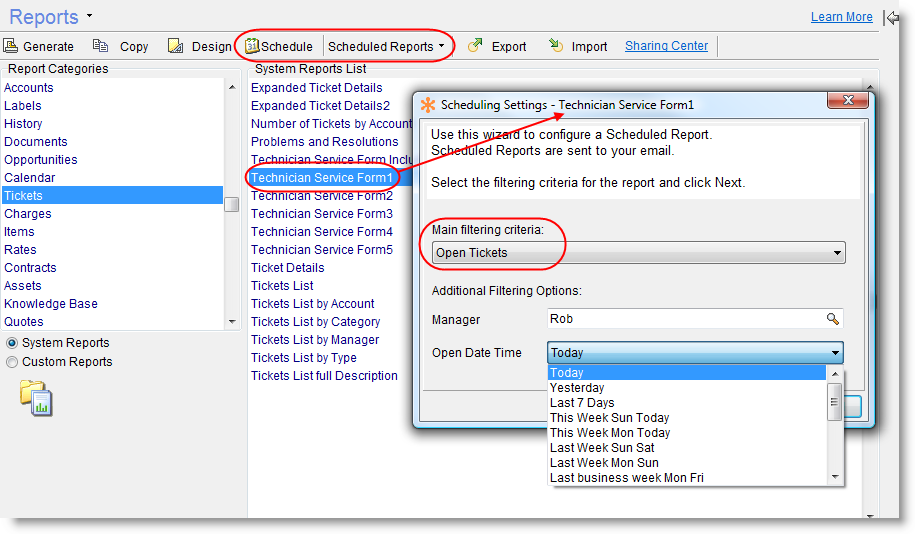
Generating lots of reports on a regular basis can be tedious and time consuming. Along with this new version we also released a new Report Scheduler server-side add-on module. This allows you to schedule reports and have them automatically emailed to you, whenever you need them.
Get daily reports for Open or Completed Tickets, weekly or monthly reports for Billed or Billable Charges, future appointments (for tomorrow/next days), list of Assets or Contracts that are expired or about to expire, perhaps you just need to get a report for the last business week from Monday to Friday or even the last quarter, there are all sorts of date range options you can select to automate this important process.
Many different types of report which you would normally generate throughout the month or even year in your business, can now be done for you automatically and then emailed to you at the appropriate times.
click to enlarge

click to enlarge
With this module you will be free to work on other matters, safe in the knowledge that your reporting is being handled for you. No more hours wasted manually generating reports, just set it and forget it.
* The Report Scheduler is as an optional standalone server-side add-on module.
==> Read more about Report Scheduler.
-
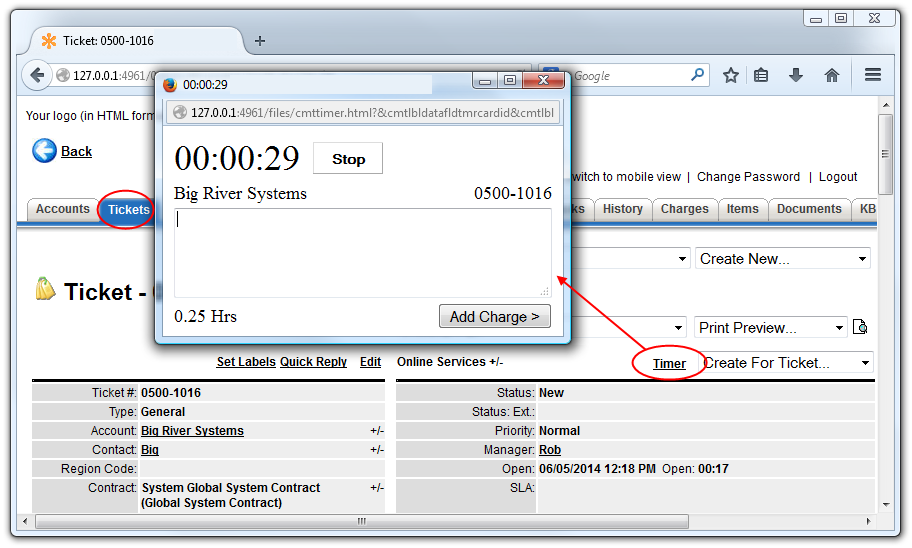
Timers
Just like the Timers you can run in the desktop application to log time for work done and convert to Charges, now you can run a Timer any time and anywhere, through the Web Interface so technicians on the road can use the timer to log their work on-site. Using this helps you capture more billable time, more accurately and of course can result in increased revenue. -
To-do List
The new and powerful To-do List feature in the desktop application also exists in the Web Interface so you’re always within reach of those important to-dos. You can instantly create, add, edit and complete them. To-do Lists can be created from pre-made templates so technicians can quickly use and manage them whenever needed. -
Charges – Quick Time Entry
Adding Charges is even easier now as it can be done by selecting the time span from a drop down list of periods, such as Last 15 min or Last 2 Hours which will then automatically fill in the Start/End times for you, saving you from having to type it all in each box manually. Also when entering hours manually there is auto-complete, for example: entering 1005 becomes 10:05 AM or PM (colon is added and AM/PM depends on the time format defined in the system). -
Tickets – Resolution from Charge Descriptions
You can now easily add Charge descriptions to the Ticket resolution when completing a Ticket. Just click the Append Charge Descriptions link which appears next to the Resolution box when editing the Ticket and the descriptions will be instantly added to the box. -
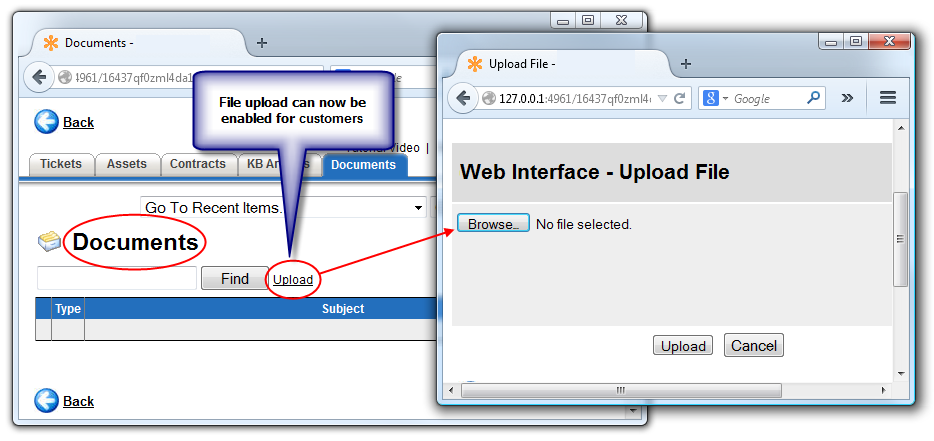
File Uploads by Customers!
Customers can now upload files directly through the Web Interface, subject to the privileges you define for them. No more asking them to email files to you for you to attach to their Account or Ticket. To use this you need to enable uploads in File > Users & Privileges > Customer Privileges for Web User (requires a custom privilege group), then enable in Tools > Options > Web Interface and make sure to set the folder mappings there as well. Once enabled your customers will see an “Upload” link on the Documents tab. -
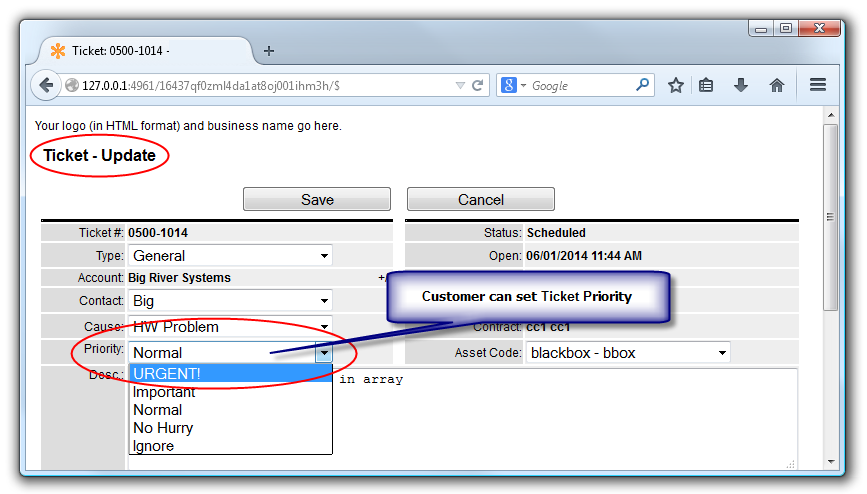
View or Edit Ticket Priorities
Customers can login to the Web Interface and view priority of a Ticket and even change the priority if they want, subject to Privileges settings. -
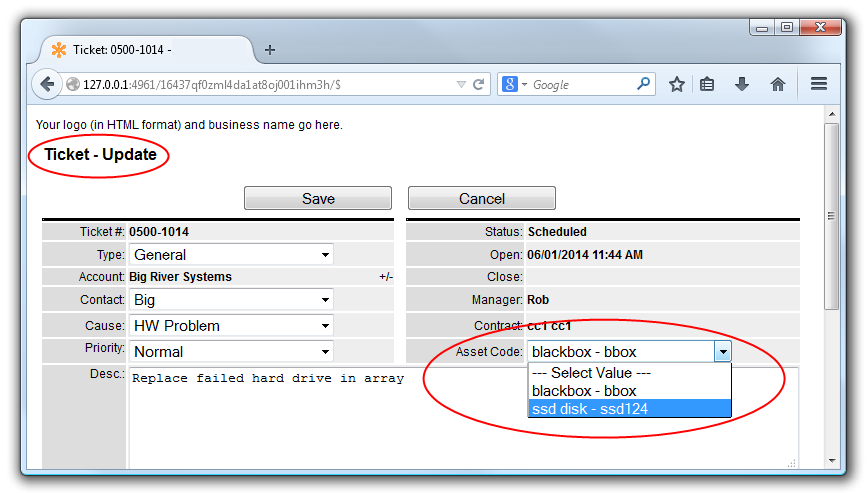
Assets
- Customer web user can select Asset for the Ticket based on the privileges.
-
The recently added Sub Assets feature now has a section just like the desktop version which is visible to Customer Web Users.
click to enlarge
click to enlarge
click to enlarge

click to enlarge
click to enlarge
click to enlarge
click to enlarge
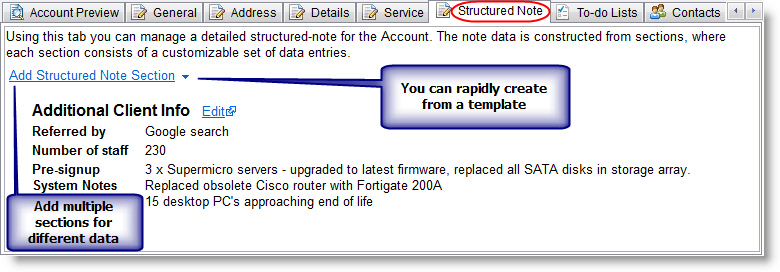
Structured Notes, similar to Asset Configuration Note, are now available in Accounts.
A Structured Note is basically a way to easily store custom data. You can create a Structured Note containing any data you want with any the data entries you need, and you can save it as a template to reuse again and again. You can even have multiple Structured Note sections applied to each Account.
For example you could create one to save data such as a sales profile or network infrastructure details, or some other important info about the client which doesn’t fit anywhere else, or anything else you can think of. You could create one called “Additional Client Info” and for the entries you could have something like this:
Referred by: Google search
Number of staff: 230
Structured Notes for Accounts can be used any time you want to store data in a predefined structure, either from a Structured Note template, or a completely new structure. Unlike a standard field, Structured Notes can contain multiple sections, with each section containing its own data entries.
click to enlarge
You can now have Structured Notes defined in Secondary Contacts so any extra information you want to save in the record for a contact can now easily be done and is visible on the contact preview on the Contacts tab and also on the Structured Notes tab in the Secondary Contact details popup.
Structured Notes allow you to save an almost unlimited amount and variety of information with the Contact record and with templates you can rapidly apply the same data format to new Contacts.

click to enlarge
Contact Preview
The Contacts tab in the Accounts window now includes a new Preview section, so you can get a nice overview of all the important information about the Contact, including the Structured Note, in one place.
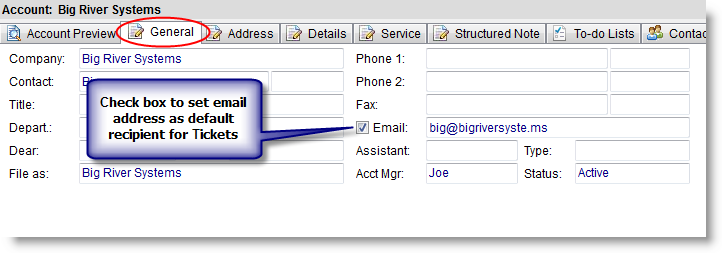
Set Contacts as Default Email Recipients
You can now set an Email address for an Account or Contact as the default recipient for all new Tickets created under the Account. You can also choose to use either ‘Email’ or ‘Email 2’ from the Account or ‘Email’ from the Contact for this default recipient.
Using this feature a Contact can be automatically notified about all Tickets under an Account, regardless of any other Alerts settings and can be fully involved with the email discussion thread. It is now possible to include any Contact, including multiple Secondary Contacts if required, in all the Ticket correspondence for the Account so if the CEO wants to be kept up to date and fully engaged with everything happening for every Ticket, now you can easily do that.
click to enlarge
Add Recipients to New Tickets
When creating a new Ticket you can now easily manage the External Recipients list (email addresses of other people who should be alerted) so that you can be sure the right people will be notified immediately rather than adding them to the Recipients list afterwards by which time the Alerts may already have been sent. Recipients can now be selected from a list of existing Contacts or you can add entirely new addresses, all through a simple interface reachable directly from the New Ticket popup.

click to enlarge
Email Alerts When Customers Accept Quotes Online
Whenever a customer accepts a Quote through the Customer Web portal the system will now send you an Alert notifying you of their acceptance; so you’ll get the good news wherever you are and don’t have to keep manually checking.
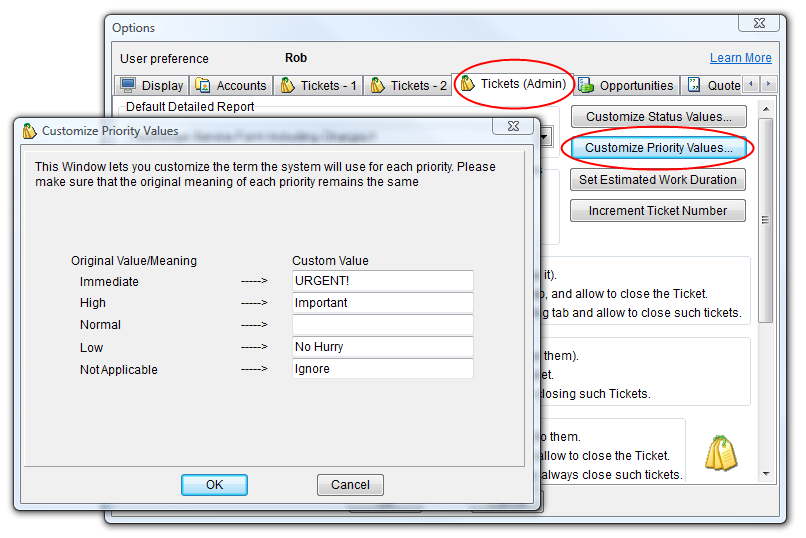
Ticket priority names such as “Normal”, “Immediate”, “Low” can now be renamed to anything you want. For example you could change “Immediate” to “Urgent” or even “Not Applicable” to “Ignore” – whatever names fit your way of working. To do this just go to Tools > Options > Tickets (Admin) and click the Customize Priority Values button.
click to enlarge
The Tab Management system has been rewritten so that tabs can now easily be reordered and also shown or hidden as required. An individual display setting can now be saved per each of the, also new, layout modes: Simple and Advanced.
In addition, tabs which are not shown on the Tabs bar, can still be quickly accessed through the new drop-down “All Tabs” menu which appears at the top right corner of the displayed tabs.
All this can be done through the usual Tab Management menu, for example, Tickets > Tools > Tab Management

click to enlarge
A new document type has been added allowing you to store links to documents or files on Google Docs or Dropbox or any other Web or “cloud” based file. Links can also use any protocol supported by the Web browser, not just HTTP, so you can even link to files on FTP or media servers of various kinds.
Adding a Web Document is just a matter of selecting that type on the New Document popup and pasting in the URL. To view them you just click the link which will open it in your Browser.

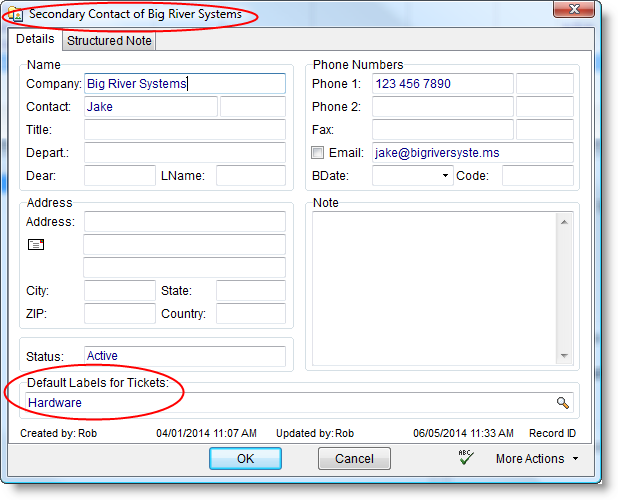
Automatically adding a default Label to a Ticket depending on the Account, Asset or Contract it is created under is a handy feature introduced in the last version but now, in version 8.0, this has been extended to allow for specifying a default Label for Secondary Contacts as well, giving you more automation over Ticket Labels.
What this means is that when a certain customer Contact submits a new Ticket, that Ticket is automatically tagged with a Label identifying it as coming from that specific Contact, in addition to any other default Labels defined such as for the Email Connector. For example if the CEO sends in an email about some issue, it can be labelled “CEO” in bright red, and then you can perhaps give it a higher priority.
The Email-to-Ticket functionality has been enhanced and now if an email arrives from a new address and the sender domain exists in the Accounts database then a new Secondary Contact is automatically created under the relevant Account, with the email sender display name taken as the Contact Name.
If appropriate, a new Ticket is created with that new Secondary Contact set as the Ticket Contact. If the email is a reply to an existing Ticket from a previously unknown sender at the known domain then a Secondary Contact is created based on the new sender.
To configure this just run the ServerConfig utility, go to the Email Connector tab, Advanced and look for the Recipients configuration in General Settings.
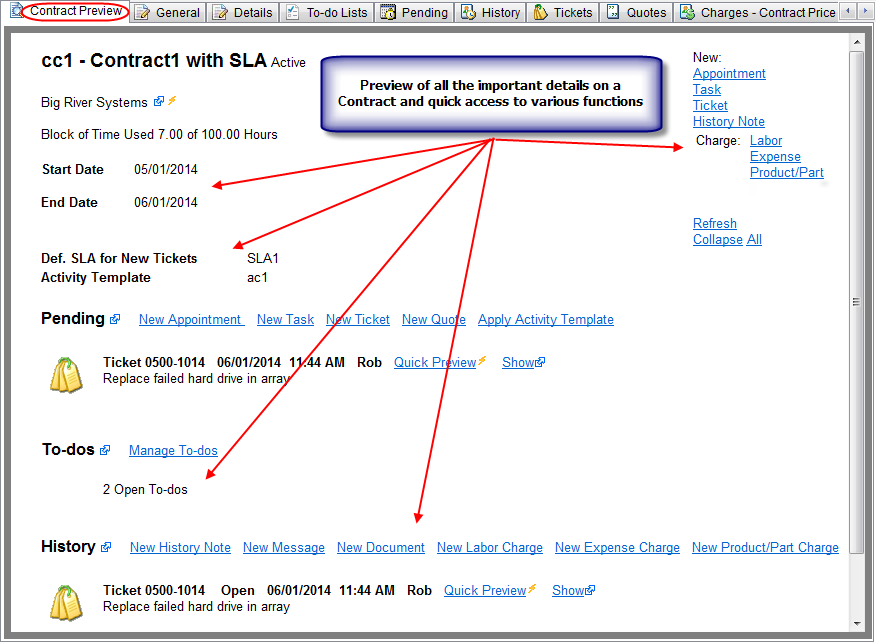
The Contracts Window now includes a new Preview tab, similar to that found on Tickets, Accounts and elsewhere so you can get a nice overview of all the important information on the Contract in one place.
click to enlarge
We’ve made some performance enhancements which result in an increase in speed when generating some of the Reports.
We’ve also added some new Charge Reports:
– Itemized Employee Charges Report
– Itemized Employee Charges Summary
For new users who are unfamiliar with our PSA software we now offer an option to use “Simple Mode” which hides some of the more complex functions so you can get started and up to speed faster before tackling the more advanced features. You can switch between Simple and Advanced modes at any time just by going to View > Switch to Simple/Advanced Mode.
-
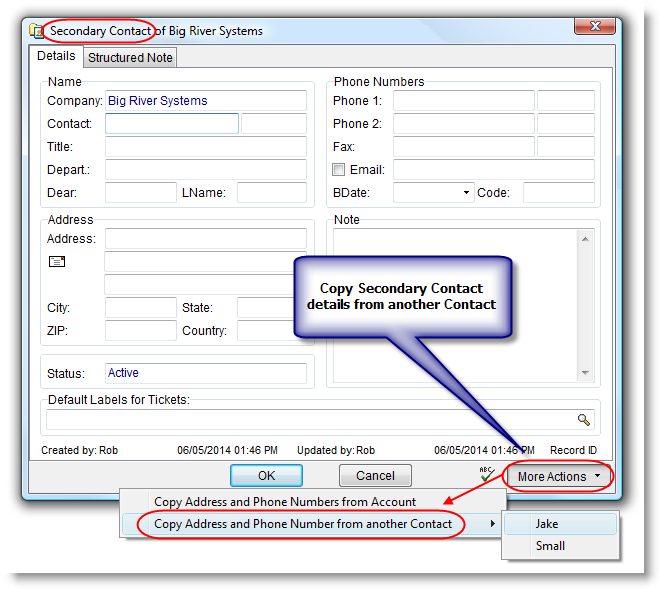
Secondary Contacts details (address and phone number) can now be copied from another Contact of the same Account, not just from the main Account, potentially saving you lots of time and typing when adding new Contacts.
-
On the Secondary Contacts tab a new column for Department was added so you can now quickly see that useful bit of information without having to open the Contact details popup.
-
Double clicking on a Secondary Contact in the Account list will now open the Contact details popup directly – another handy time saver.
You can now truncate the Ticket Description as it appears in lists to show only the first line. Using this you can have a much cleaner looking list of Tickets. You can configure this with the checkbox on Tools > Options > Tickets – 1.
On the Assets tab under Account now by default only the Active Assets are shown so you no longer have to sift through the Inactive Assets each time. You can easily show inactive Assets whenever needed by selecting from the Status dropdown which appears at the bottom of the Assets tab.
The default status for the checkbox for Purchased From Us on the Asset Details tab can now be configured by right-clicking the field and going to the Field Behavior tab so if you prefer you can now ensure it is always checked by default or unchecked, whichever suits your situation better.
When employees get Alerts about a new internal message, the message priority is now shown in the email subject thereby helping to ensure that staff know at a glance if something needs urgent attention or what action they may need to take based on the priority.
A number of minor bugs have been fixed.
A variety of performance improvements have been implemented.