Report Scheduler
Contents
Introduction
Report Scheduler for Employees
Using Report Scheduler for Employees add-on module you can prepare your Reports in advance and have them sent to you at the defined intervals. This module will save you a lot of time and effort as you no longer have to spend your valuable time manually configuring reports every time you need one and overall will improve the efficiency of your business by ensuring you have all the Reports you depend on, ready for you to use and always to hand at the appropriate time.
Report Scheduler for Customers
Available in version 11 the new ‘Report Scheduler for Customers’ optional add-on module, lets you automate sending reports to customers on a daily/weekly/monthly/yearly basis.

Setting up the Report Scheduler Module
The Report Scheduler module is a standalone module that runs as part of the RangerMSP Server Windows Service on your server, and so the RangerMSP Server service must be installed. Only then you can start the service in order to use the Report Scheduler.
If you already use the Email Connector or Alerts Server then you can skip this section as the RangerMSP Server service is already installed and there is nothing more you need to do besides scheduling your Reports.
Install Service
This part of the installation should be performed on the server itself.
Automatic installation (requires RangerMSP 14 and up)
Log in to to your Server with a Window's Administrator account and run the installer from:
<Installation_DIR>\RangerMSP\Utils\Install\InstallServerSideWindowsServices.exe
OR -
Manual installation
- Open a command prompt window: Right-click the command prompt icon and and choose 'Run As Administrator'.
- Type the following command:
<Installation_DIR>\RangerMSP\Server\CRMServer.exe -install
Note: The <Installation_Dir> must refer to a LOCAL server path (e.g. c:\ or D:\Software, etc.) and NOT to a shared network name/path. - Wait for a success message to appear, indicating the service was installed successfully.
- Open the Windows Services Management windows from Control Panel > Administration Tools > Services.
- Verify that a Windows service called RangerMSP Server is now displayed in the services list.
- If the service is not there, make sure again that you are running the command prompt Window using 'Run as Administrator' and try again.
Running RangerMSP Server Service
- Once the RangerMSP Server Service is installed, setup the RangerMSP Report Scheduler as explained in Activating the Report Scheduler.
- Open the Windows Services Management windows from Control Panel > Administration Tools > Services.
- Locate the RangerMSP Server service and start the service (right-click > Start).
- Make sure that it is set to start automatically with a 'Delayed Start' (Startup type > Automatic Delayed Start) each time the server is restarted.
Activating the Report Scheduler
- Log into the Server with a Windows Administrator user. Note that the setup program must run from the same server as the one where the RangerMSP installation sits and from where you plan to run the Report Scheduler.
- Run <Installation_DIR>\RangerMSP\Server\ServerConfig.exe.
- Note: there are two executable files under the server folder, make sure you are running the configuration program (ServerConfig.exe).
- In the window that opens, click the Report Scheduler tab.

In this tab, you should define the Report Scheduler Settings as follows:
- System State – The state can be one of the following: On or Off.
- On (default) - You should use the On setting when you wish to activate the Report Scheduler mechanism. The system state is ON by default.
- Off - This mode should be used when you do not want the system to prepare or send Scheduled Reports at all. This also means when you reactivate the RangerMSP Report Scheduler, no Reports will be waiting to be sent.
- Sender Name - Here you define the Email Sender Name that will be used when sending the Reports. You can define an Alias to be used which will reflect the source of this email (such as "RangerMSP Report"). The Email address is taken from the Public Email Address tab.
- Bcc Scheduled Reports Emails - You can optionally add additional recipients that will be Bcc’d on every report emailed to the customers.
Important Notes:
- Reports will start to be sent only after each user defines their own Scheduled Report settings, see below.
- Changes to settings may take some time to take effect in the RangerMSP Server. In order for it to take effect immediately, you should restart the RangerMSP Server Service.
- If you have not done so previously, you will also need to set your Public Email Address and setup your Outgoing Mail Server - both are done through the relevant tabs in the ServerConfig.
Uninstall Service
Should you ever need to uninstall the RangerMSP Server service, follow these steps:
- Open the Windows Services Management windows from Control Panel > Administration Tools > Services.
- Stop the RangerMSP Server service.
- Open a command prompt window: Right-click the command prompt icon and and choose 'Run As Administrator'.
- Type the following command:
<Installation_DIR>\Server\CRMServer.exe -uninstall

Scheduling a Report for Employees
To schedule a Report and have it mailed to you automatically, do the following:
- Go to the Reports window and select the Report you want to schedule from the list.
- Click the Schedule button in the menu bar or go to Reports > Schedule This Report.
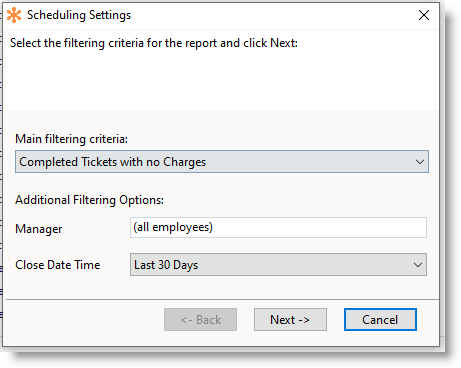
- In the Scheduling Settings popup which then opens, select one of the Filtering_options .
- Select additional filtering option, if relevant for the specific type of Report, such as the Account Manager.
- Select the Date - depending on the type of Report, this field name can vary and besides just Date it could be called Creation Date, Open Date Time, Purchase Date or something similar. For the Date you can select date ranges for the Report such as Today, Yesterday, Last 7 days or many more. So if you want to get a Report sent showing all new Accounts created yesterday you can easily do that now.
- Now click Next to go to the recurring settings for the Scheduled Report - in other words here you specify how often and at what exact time of day you want the Report generated and sent to you. You can for example have the Report for yesterday sent to you daily at 9 am. The recurring settings Options menu changes dynamically depending on whether you choose Daily, Weekly or some other Type.
- Click Next again and now select the email address/es to send to and specify the name of the Report which will appear in the email subject. An email address must have been previously defined for the Account before you can schedule a Report.
- Click Finish and it is done.


Filtering options
Define simple criteria
- Select the Main filtering criteria from the predefined list, depending on the report type, for example “Open Tickets” or “Completed Tickets with no Charges”.
- Select additional filtering option, if relevant for the specific type of Report, such as the Account Manager.
- Select the Date - depending on the type of Report, this field name can vary and besides just Date it could be called Creation Date, Open Date Time, Purchase Date or something similar. For the Date you can select date ranges for the Report such as Today, Yesterday, Last 7 days or many more. So if you want to get a Report sent showing all new Accounts created yesterday you can easily do that now.

Define a new filter
Select the fields to filter the scheduled report by and their values. See more details in Filters.

Use a new filter from template
Use predefined templates to create a filter. This will automatically define the fields and values for the search. These settings can be modified once the template is selected.

Use a saved filter
Select a filter from the previously Saved Filters.

Managing My Scheduled Reports
You can manage your existing Scheduled Reports and edit or delete any of them as required.
- Click the My Scheduled Reports button on the menu bar or go to Reports > My Scheduled Reports.
- Select the Report you want to manage from the drop down list displayed.
- On the Scheduling Settings popup which appears you can select either:
- Edit Settings to edit the scheduling for that Report, which returns you to the Scheduling Settings window described above in Scheduling a Report.
- Delete to remove it completely.
- Edit Settings to edit the scheduling for that Report, which returns you to the Scheduling Settings window described above in Scheduling a Report.

Scheduling a Report for Customers
- Define a Scheduled Customer Report (requires Sys Admin privileges):
- Go to the Reports window and select the Report you want to define as a Scheduled Customer Report from the list.
- Click the Schedule button in the menu bar or go to Reports > Schedule this Report for Customers.
- In the Scheduling Settings popup which then opens, select the Main filtering criteria, for example “Completed Tickets” or “Tickets created recently” or Assets by Warrant/License Expiration Date’.
- Select the Date - depending on the type of Report, this field name can vary and besides just Date it could be called Creation Date, Open Date Time, Warranty Expiration Date or something similar. For the Date you can select date ranges for the Report such as Today, Yesterday, Last 7 days or many more. So if you want to email the customer Report showing Assets expiring next month, you can easily do that now.
- Click Next to go to the recurring settings for the Scheduled Customer Report - in other words here you specify how often and at what exact time of day the Report generated and sent to subscribed customers. For example, the Report for last month sent to the customer monthly at the last day of the month at 9 pm. The recurring settings Options menu changes dynamically depending on whether you choose Daily, Weekly or some other Type.
- Click Next again and select the Email Template to use when email the report to a subscribed customer. The system comes with default templates which can be found in Settings > Email Templates.
- Set the name of Scheduled Customer Report, for example: ‘Weekly Tickets report’, or ‘Assets expiring next month’.
- Click Finish.
- Go to the Reports window and select the Report you want to define as a Scheduled Customer Report from the list.
- To subscribe the customer to Scheduled Customer Report do the following:
- Go to the Scheduled Reports tab of the Account, click Subscribe button and select the report.
- Select email recipients that each report will be emailed to.
- Click OK and it is done.
- Go to the Scheduled Reports tab of the Account, click Subscribe button and select the report.
Managing Customer Scheduled Reports
Managing Customer Scheduled Reports
- Click the Customer Scheduled Reports button on the menu bar or go to Reports > Customer Scheduled Reports.
- Select the report you want to manage from the drop down list displayed.
- On the Scheduling Settings popup which appears you can select either:
- Edit Settings to edit the scheduling for that Report, which returns you to the Scheduling Settings window described above in Scheduling a Report for Customer.
- Show Subscribed Accounts - click to show the Accounts subscribed to this report.
- Delete to remove it completely. The report can be deleted only if no Accounts subscribed to the report.
Troubleshooting
I setup a Scheduled Report but nothing arrived.
Solution: You should check the following options:
- When creating a new Scheduled Report (or editing one) it can take up to 15 minutes before it is updated in the service that runs the server, unless the RangerMSP Server service is restarted to apply the updates immediately.
- Reports are not sent immediately but only on the defined schedule so perhaps the time for sending did not yet arrive.
- Make sure that the Report Scheduler System State is set to ON in the ServerConfig.
- Make sure the Email address (as defined in the Employee Account on the General or Address tab) which you selected for sending Reports to is valid.
- Make sure the RangerMSP Server service is running on your machine.
* This new feature comes as an optional standalone add-on module.