Setting up Email Delivery Service
If you already use the Email Connector or Alerts Server or Report Scheduler then you can skip this section as the RangerMSP Server service is already installed and there is nothing more you need to do.
Contents
Install Service
This part of the installation should be performed on the server itself.
Automatic installation (requires RangerMSP 14 and up)
Log in to to your Server with a Window's Administrator account and run the installer from:
<Installation_DIR>\RangerMSP\Utils\Install\InstallServerSideWindowsServices.exe
OR -
Manual installation
- Open a command prompt window: Right-click the command prompt icon and and choose 'Run As Administrator'.
- Type the following command:
<Installation_DIR>\RangerMSP\Server\CRMServer.exe -install
Note: The <Installation_Dir> must refer to a LOCAL server path (e.g. c:\ or D:\Software, etc.) and NOT to a shared network name/path. - Wait for a success message to appear, indicating the service was installed successfully.
- Open the Windows Services Management windows from Control Panel > Administration Tools > Services.
- Verify that a Windows service called RangerMSP Server is now displayed in the services list.
- If the service is not there, make sure again that you are running the command prompt Window using 'Run as Administrator' and try again.
Running RangerMSP Server Service
- Open the Windows Services Management windows from Control Panel > Administration Tools > Services.
- Locate the RangerMSP Server service and start the service (right-click > Start).
- Make sure that it is set to start automatically with a 'Delayed Start' (Startup type > Automatic Delayed Start) each time the server is restarted.
Outgoing Mail Server Settings
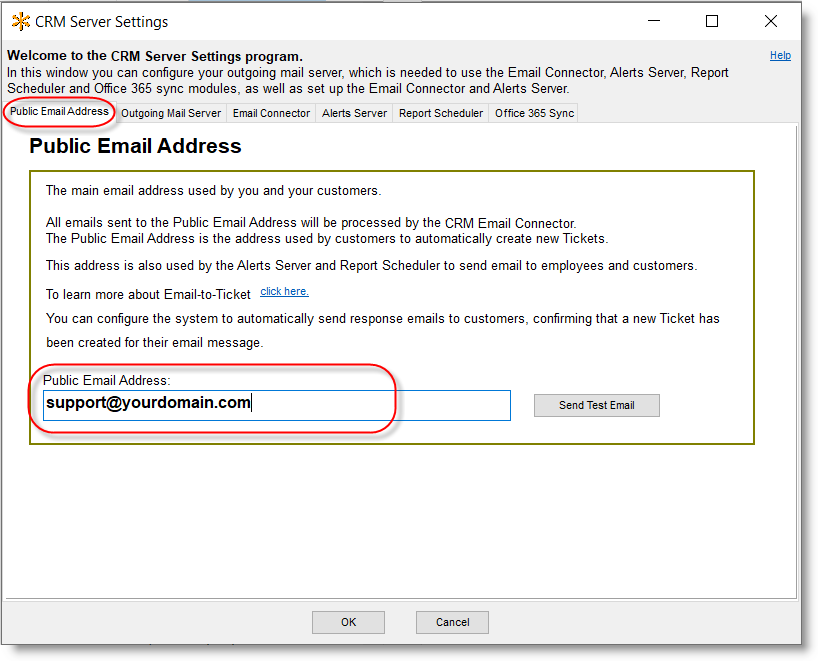
Public Email Address
The Public Email Address will be used when sending the emails from RangerMSP Server.
Outgoing Email Settings
The Outgoing Email Settings are used to send emails from RangerMSP Server.
Make sure to test your settings once defined, using the Test button in the configuration program, to make sure the emails can be sent using your settings.
Note that the same settings are used both by RangerMSP Alerts and Email Connector, and should be define only once. If you already defined this for the Email Connector, you can skip this part.
To define Outgoing emails settings:
- Log into the Server with a Windows Administrator user. Note that the setup program must run from the same server as the one where the RangerMSP installation sits and from where you plan to run the Email Connector.
- Run <Installation_DIR>\RangerMSP\Server\ServerConfig.exe.
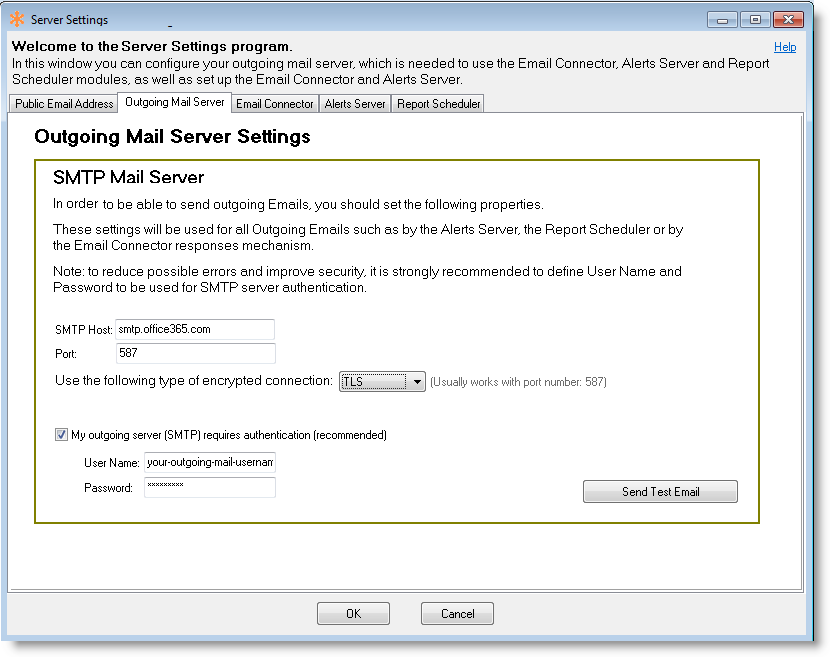
Note: there are two executable files under the server folder, make sure you are running the configuration program (ServerConfig.exe). - In the window that opens, click the Outgoing Mail Server tab:
In this tab, you should define the following:
- SMTP Host - enter your Outgoing SMTP Mail Server.
- Port - enter the Outgoing SMTP port.
- My outgoing server (SMTP) requires authentication - if checked, must fill in the authentication details below:
- User Name - the User Name to be used for SMTP authentication
- Password - the password related to the specified User Name
To reduce errors and improve security it is strongly recommended to use SMTP authentication, using a user name and password for SMTP access.
- Test SMTP Connection - use the test button to verify that your account is working. If there is missing or incorrect information, such as your password, you will be prompted to supply or correct it.
- Send Test Email - use this test button to send a test email using the settings you defined. After clicking it you need to specify the From email address and the To email address that will be used for sending the Test Email message.
Uninstall Service
To Uninstall RangerMSP Server service:
- Open the Windows Services Management windows from Control Panel > Administration Tools > Services.
- Stop the RangerMSP Server service.
- Open a command prompt window: Right-click the command prompt icon and and choose 'Run As Administrator'.
- Type the following command:
<Installation_DIR>\RangerMSP\Server\CRMServer.exe -uninstall

