Continuum Link
Contents
Introduction
The RangerMSP-Continuum Integration automatically creates tickets in RangerMSP from alerts and service tickets generated by the Continuum system, or from tickets created manually by the Continuum NOC. Users can then close the Ticket in RangerMSP, and it will be closed in Continuum.
The RangerMSP integration with Continuum includes:
- Two-ways Ticket Integration.
- Continuum’s Tickets create Tickets in RangerMSP.
- Closing a Ticket in RangerMSP closes the Ticket in Continuum.
- RangerMSP Tickets can be assigned to Continuum’s NOC / Service Desk.
- New Tickets in Continuum can be created from RangerMSP’s Tickets
- Comments for Tickets can be sent from RangerMSP to Continuum.
- The ability to link Account to Site in Continuum or create Account from Site.
- The ability to link Asset to Device in Continuum or create Asset from Device.
Once the RangerMSP-Continuum Integration has been configured, Continuum Ticketing System is disabled and Ticket management is performed solely in RangerMSP.
Ticket can still be viewed in Continuum (read-only); however, the master Ticket is managed in RangerMSP. When closing a Ticket in RangerMSP it is closed in Continuum. When closing a Ticket in Continuum it adds a History Note to the Ticket in RangerMSP, however, the Ticket stays open.
Technical Note
The integration is based on a new Service running on your RangerMSP server (called CRM RMM Server Service), which accepts all alerts and Tickets from Continuum and creates the Ticket in RangerMSP.
Continuum Settings
This section describes the Setup steps required in the Continuum Portal in order to start working with RangerMSP as your PSA system in Continuum.
Important Notes:
- Once the RangerMSP-Continuum Integration has been configured on Continuum Portal, it takes a few hours (up to 24 hours) until the new settings apply on the Continuum back-end. Note that even if all settings seem correct on Continuum side, you should wait a few hours until the RangerMSPServer service can connect and download data.
- Once RangerMSP is activated as your PSA in Continuum Portal, Continuum Ticketing System is disabled and Ticket management is performed solely in RangerMSP.
- Since all Ticket Management is disabled in Continuum, Continuum email alerts for Tickets will also be disabled, and you will no longer get email alerts for new Tickets from Continuum Portal. In case you want to receive email alerts for new Tickets (arriving from Continuum Portal) via RangerMSP, you may consider using RangerMSP Alerts Server module, which sends email alerts for new updates in the RangerMSP system. See more details in RangerMSP Alerts Server.
To allow CRM RMM service to connect with Continuum and sync with it, a Continuum Partner Security code (also known as PSG) is required.
To setup Continuum PSG:
- Login to the Continuum Portal with Admin account and go to Admin.
- The ITS Portal Setup window is displayed. Click My Company > PSA integration in the left column.
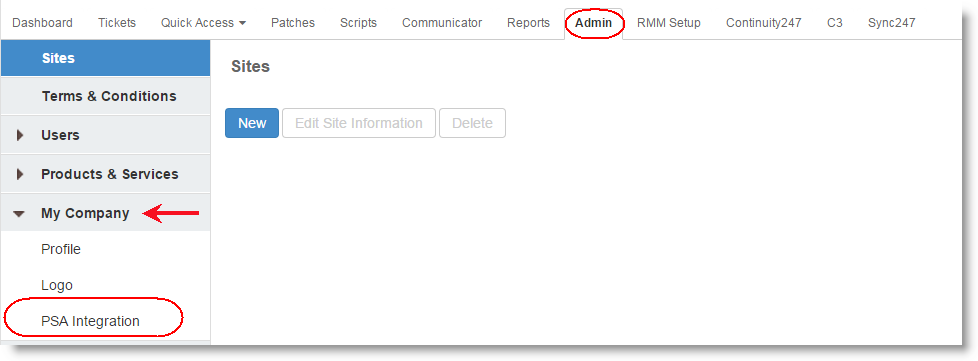
- Click the link “RangerMSP” option.

- Copy the Security Code on the screen and click Enable. This will lock the Code to your account. Use this Code to complete the configuration in RangerMSP. See RangerMSP Setup.
- Now on the same page click Activate. You will receive message “RangerMSP Activated Successfully”.
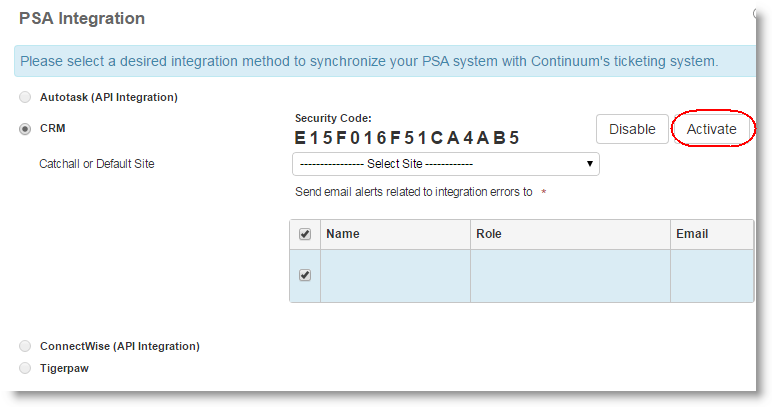
- After receiving the "Activated successfully" message, it takes a few hours until the new settings apply on the Continuum back-end. Note that even if all settings seem correct on Continuum side, you should wait a few hours until the RangerMSPServer service can connect and download data.


For more details on Continuum Setting, click to review the Continuum configuration guide
RangerMSP Setup
Please make sure to enable the integration with RangerMSP on the Continuum side (see Continuum Settings) before you proceed with the RangerMSP side setup below.
To set up RangerMSP to work with Continuum, the following steps are required:
- Backup RangerMSP Database.
- Initialize Continuum PSG.
- Install CRM RMM Server.
- Validate CRM RMM Server downloads Continuum Sites and Devices to the RangerMSP server.
- Link Accounts and Assets in RangerMSP(*) to Sites in and Devices Continuum.
- Enable Continuum Integration.
* Note:
The full integration with Continuum on the RangerMSP side will be disabled by default until you activate it explicitly, and Tickets will not be transferred to RangerMSP until then. This is to make sure users first link Continuum Sites to RangerMSP Accounts to avoid many duplicate Accounts which may be created if Tickets arrive before the links take place. Once all Accounts are linked, users should enable the integration, see Enabling Continuum Integration .
Backup RangerMSP Database
Before starting to work with the Continuum integration, make sure to backup your RangerMSP database.
The integration includes linking and importing sites and devices into RangerMSP and it is strongly recommended to backup your system before starting to work with it.
Initialize Continuum PSG
After you finish setting up the Security Code (PSG) at the Continuum Portal (see Continuum Settings), you can move on to the next step and enter the PSG into RangerMSP settings.
To initialize the PSG in RangerMSP:
- Open <Installation_DIR>\RangerMSP\RMM\CMTZenithLink.ini
- Copy the Security Code value from Continuum PSA Settings window as described above in Continuum Settings, and paste your Continuum Partner Security Code as the value for token PSG:
PSG=<Your-Continuum-Security-Code>
- Save your changes.
Install CRM RMM Server Service
After you finish setting up all of the required settings (see Initialize Continuum PSG), you can move on to the next step and install the CRM RMM Server service.
The 'CRM RMM Server' runs as a Windows Service on your server.
Before you install the CRM RMM Server
- Make sure to complete the Setup steps prior to installing the Windows Service.
- Make sure to allow the CRM RMM Server Service in your DEP settings.
This part of the installation should be performed on the server itself.
Automatic installation (requires RangerMSP 14 and up)
Log in to to your Server with a Window's Administrator account and run the installer from:
<Installation_DIR>\RangerMSP\Utils\Install\InstallServerSideWindowsServices.exe
OR -
Manual installation
- Open a command prompt window: Right-click the command prompt icon and and choose 'Run As Adminsitrator'.
- Type the following command:
<Installation_DIR>\RangerMSP\RMM\CRMRMMServer.exe -install
Note: The <Installation_Dir> must refer to a LOCAL server path (e.g. C:\ or D:\Software, etc.) and NOT to a shared network name/path. - Wait for a success message to appear, indicating the service was installed successfully.
- Open the Windows Services Management windows from Control Panel > Administration Tools > Services.
- Verify that a Window's service called CRM RMM Server is now displayed the services list.
- If the service is not there, make sure again that you are running the command prompt Window using 'Run as Administrator' and try again.
Start Service:
Using the Window's Services Management window start the service (right-click > Start). Make sure that it is set to start automatically with a Delayed Start (Startup type > Automatic Delayed Start) each time the server is restarted.
Download Sites and Devices Files
In order for the Tickets arriving from Continuum to be created for the correct Account and Asset, all Continuum Sites should first be linked to the parallel RangerMSP Accounts, and Devices must be linked to Assets.
Managing the links requires downloading the list of Sites and Devices from Continuum. This is done automatically by CRM RMM Server once it is activated(*). Note that the Continuum Integration must NOT be enabled at the RangerMSP side yet at this point; only the service should be activated in order for it to download the Sites and Devices details.
(*)Important Note:
After the RangerMSP-Continuum Integration has been configured on Continuum Portal, it takes a few hours (up to 24 hours) until the new settings apply on the Continuum back-end. Note that even if all settings seem correct on Continuum side, you should wait a few hours until the 'CRM RMM Server' service can connect and download data.
Once the settings have been applied at Continuum Portal (which can take a few hours, see note above), and the 'CRM RMM Server' is activated, it tries to connect to Continuum and download the following files:
- <server>\RangerMSP\Dbsys\ZenithSites_RMAZenithINFOTECHID1.cmt
- <server>\RangerMSP\Dbsys\ZenithDevices_RMAZenithINFOTECHID1.cmt
Both files are used by the Continuum Links manager in RangerMSP client to link Continuum Sites and Devices to equivalent RangerMSP Accounts and Assets.
Make sure both files exist before moving on to the next step which is Linking Accounts and Assets.
Handling Errors
In case CRM RMM Server fails to download Sites and Devices details, the system will alert the user with a message when attempting to use the Continuum Links Manager (e.g. from Accounts > Tools > Open Continuum Links Manager). In such case, refer to the Troubleshooting section.
Link Accounts and Sites
When a Ticket arrives from Continuum it is created in RangerMSP and automatically linked to the Account which is associated with the Site specified for the Ticket. In case the Site is not associated to any RangerMSP Account, a temporary Account is created and the Ticket is linked to it.
To avoid redundant temporary Accounts from being created, all Continuum Sites should first be linked to the equivalent RangerMSP Accounts. Only when all Accounts are associated to Sites, a System Administrator should enable the integration. See Enable Continuum Integration.
Link Accounts to Sites
Before starting to work with the Continuum Integration, an Administrator must first link all Accounts to the equivalent Sites in Continuum. This step is required in order for Tickets arriving from Continuum to be opened under the correct Account.
To Link Accounts to Sites in Continuum see Link Account to Site.
Link Assets to Devices
Before starting to work with the Continuum Integration, an Administrator must first link all and Assets to the equivalent Devices in Continuum. This step is required in order for Tickets arriving from Continuum to be opened under the correct Asset.
To Link Assets to Devices in Continuum see Link Asset to Device.
Enable Continuum Integration
Enabling Continuum Integration on the RangerMSP server (assuming the Continuum setup was already performed) will immediately start importing Tickets from Continuum into RangerMSP. Make sure to link your Continuum Sites with RangerMSP Accounts prior to enabling the integration on RangerMSP's side, to avoid duplicate Account creation. See more details in Link Accounts and Assets.
To enable Continuum Integration on RangerMSP's side and start Tickets transfer from Continuum:
- Open <Installation_DIR>\RangerMSP\RMM\CmtZenithLink.ini
- Change the value for ProcessContinuumUpdatesQueue to Y (by default it's set to N in order to allow user first to perform links between Continuum sites/devices to RangerMSP).
- Restart 'CRM RMM Server' Service.
Uninstall CRM RMM Server Service
Should you ever need to uninstall the RMM Server service, follow this procedure:
- Open Command Prompt as administrator (e.g. right click the option and select the Run as Administrator).
- Navigate to the \RangerMSP\RMM folder.
- Then type: CRMRMMServer.exe -uninstall
- Wait for a while and you should receive a verification that the service was uninstalled successfully.
Two-Ways Ticket Integration
Only after installing the 'CRM RMM Server', linking between Accounts and Sites and enabling the Integration, will the Ticket integration come into action.
Once the integration is enabled, all Tickets are managed only from RangerMSP.
The Ticket integration includes:
- New Ticket in RangerMSP from Continuum: Tickets arriving from Continuum automatically create Tickets in RangerMSP.
- New Ticket in Continuum from RangerMSP: Tickets can be created in Continuum from RangerMSP.
- Reassign: Tickets can be assigned to Continuum’s NOC and Virtual Service Desk from RangerMSP.
- Update: Notes can be added to Tickets in RangerMSP and be sent to Continuum.
- Close: Tickets can be closed from RangerMSP and will then be closed automatically in Continuum
Notes:
- Any updates to the Ticket details will not update the Ticket in Continuum.
- Closing a Ticket in RangerMSP will close the Ticket in Continuum.
- Closing a Ticket in Continuum will not change the Status in RangerMSP.
The following diagram demonstrated the work-flow when working with RangerMSP-Continuum integration:

See more details on Ticket updates in the sections below.
New Ticket
New Tickets arriving from Continuum automatically create a Ticket in RangerMSP by the CRM RMM server.
A standard (*) automatic Ticket creation process includes:
- Ticket arrives at the CRM RMM Server.
- Ticket is created in RangerMSP.
- Ticket is linked to an Asset.
- Ticket appears in RangerMSP Ticket Inbox.
(*) See how the system handles non-standard scenarios in Ticket Creation Special Cases.
When a new Ticket is created in Continuum (by a user or from an Alerts), CRM RMM Server pulls the new ticket details and creates the Ticket in RangerMSP.
The new Ticket details in RangerMSP include:
- Ticket description taken from the Continuum Ticket description.
- Ticket is assigned to the Account manager for this Account (if defined). Otherwise the Ticket Manager is taken from Default Ticket Manager defined in Tools > Options > Tickets (Admin) > Default Manager.
- History Note is automatically added to the Ticket with the creation date and time from Continuum.
- Ticket is linked to the relevant Asset. If the system cannot determine the Asset, the Continuum Device details are added as a note to the Ticket. See more details in Device Not Linked to Asset.
After the Ticket is created it is automatically added to the Tickets Inbox.
New Ticket in Continuum
Once the RangerMSP-Continuum integration is enabled, all Tickets are managed only from RangerMSP. To create a Ticket in Continuum (e.g. assign work to the Continuum NOC team), Ticket should be created first in RangerMSP, and then transferred to Continuum.
To create a Ticket in Continuum:
- Create the Ticket in RangerMSP and open the Ticket Window.
- Go to Tickets > Tools > Create/Update Ticket in Continuum.
- The following window will open:

- Choose the assignee. Ticket can be assigned to:
- NOC Team
- RangerMSP
- Virtual Services Desk
- Add a Note if needed.
- Click OK to create the Ticket in Continuum.
Note that the RangerMSP Ticket has to be linked to an Account that is linked to a Continuum site and Asset linked to a Device (optional)
Ticket Updates
When working with the RangerMSP-Continuum Link, Tickets are managed only in RangerMSP.
The following updates in Continuum are possible:
- Reassign Ticket (See Reassigning Tickets).
- Add Notes (See Adding Notes)
Note that Updating Ticket details (such as Description, assigned technician or any other details) will not affect the Ticket in Continuum.
While Tickets can be closed in Continuum, such an event does not affect the Ticket Status in RangerMSP.
Reassigning Tickets
Once the RangerMSP-Continuum integration is enabled, all Tickets are managed only from RangerMSP. To reassign a Ticket in Continuum (e.g. assign work to the Continuum NOC team), it should be reassigned via RangerMSP.
To reassign a Ticket in Continuum:
- Select the Ticket in RangerMSP.
- Go to Tickets > Tools > Create/Update Ticket in Continuum.
- The follow window will open:

- Choose the assignee. Ticket can be assigned to:
- Keep current assignment.
- RangerMSP
- Virtual Services Desk
- Add a Note if needed.
- Click OK to reassign the Ticket in Continuum.
Note that the RangerMSP Ticket has to be linked to an Account that is linked to a Continuum site and Asset linked to a Device (optional)
Receiving Tickets Back from Continuum
Once the RangerMSP-Continuum integration is enabled, all Tickets are managed only from RangerMSP. However, it is possible to assign work to the Continuum NOC team) via RangerMSP.
When a Ticket is assigned to NOC Team or Virtual Service Desk Team they can return the Ticket to RangerMSP.
For example:
- When the NOC Team or Virtual Service Desk Team resolve the problem and updated Ticket status to "Work completed"
- When the NOC Team need approval or additional information from the Partner they send the ticket back to Partner (i.e. RangerMSP) with status="Approval Required" or "Info Needed".
A Ticket that is returned to RangerMSP:
- Ticket goes into Inbox
- Update is logged in the Ticket's History as an audit entry.
Adding Notes
Adding Notes to a Ticket will update the Note in Continuum and will add an Audit entry for this action in RangerMSP. The Note can be viewed in RangerMSP in the History area of the Ticket.
To Add a Note in Continuum:
- Select the Ticket in RangerMSP.
- Go to Tickets > Tools > Create/Update Ticket in Continuum.
- The follow window will open:
- Update the Note.
- Click OK to add notes to the Ticket in Continuum.
Closing Tickets
When working with the RangerMSP-Continuum Link, Tickets are managed only in RangerMSP. Whenever a Ticket is Completed in RangerMSP it is also being automatically closed in Continuum.
To close a Ticket:
- Open the Ticket in RangerMSP.
- Change the Ticket status to Completed (can be done from the toolbar, by dragging to a status or by changing the status manually).
- Ticket is automatically closed in Continuum.
Note that Tickets that are being closed via Continuum, will not affect the Ticket Status in RangerMSP.
Managing Continuum Links
In order for Tickets arriving from Continuum to be opened under the correct Account and Asset, you must create an association between Sites and Devices in Continuum to Accounts and Assets in RangerMSP.
Creating the links is done using the Continuum Links Manager Window via RangerMSP.
Note: CRM RMM Server service must first be installed in order for the Continuum Sites and Devices to be downloaded to the RangerMSP server. See more details in Download Sites and Devices Files.
Link Account to Site
In order for Tickets arriving from Continuum to be opened under the correct Account, you must create an association between sites in Continuum to Accounts in RangerMSP, or create an Account in RangerMSP for this Site.
Note that multiple Sites in Continuum can be linked to the same Account in RangerMSP, since the Sites may represent several physical sites for the same client, thus represented in the same RangerMSP Account.
Use the Continuum Links Manager Window to create the association:
- In the Accounts Window, go to Accounts > Tools > Continuum Links Manager.
- In the Wizard which opens you can find a list of available un-linked sites from Continuum. This list gets updated every hour. In case you receive a message about a missing file, this means the initial setup hasn't been completed yet. For more details refer to Download Sites and Devices Files.
- Select the Site you want to link, and click Next. The following screen appears:
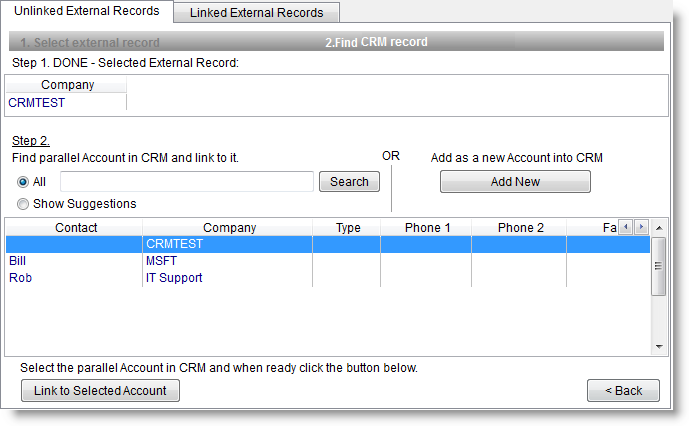
- In above screen you should choose the RangerMSP Account to be linked to the external record:
- Find the parallel Account(**) using the search options:
- Search for Account by keyword/s.
- See Account list recommended by the system based on the Site name.
- Once you have chosen the Account, click Link to Account.
- OR create a new Account based on the selected Site details(*).
(*) Note: When creating a new Account in RangerMSP based on the Site from Continuum, only the Site name is copied to RangerMSP. No other details are transferred.
(**) Note: that multiple Sites in Continuum can be linked to the same Account in RangerMSP, since the Sites may represent several physical sites for the same client, thus represented in the same RangerMSP Account.
- Find the parallel Account(**) using the search options:

At this point the Account and Site are linked.
To cancel this link between the Account and Site, hit the Linked Accounts tab to find the Account and remove the link. See Unlink Account From Site.
Unlink Account From Site
Accounts in RangerMSP must be linked to Sites in Continuum in order for Tickets to be created under the correct Account. If you want to cancel a link between an Account and a Site, you can use two methods:
Use the Continuum Account Link Manager (recommended, this way you can see the linked Site details before removing the link):
- In the Accounts Window, go to Accounts > Tools > Continuum Links Manager.
- In the Window which opens hit the Linked Records tab to find Accounts which are already linked.
- This tab displays a list of Accounts linked to Sited and displays the linked Site details in the bottom pane (if the details are available). This list gets updated every hour.
- Select the Account you want to unlink, and click Remove Link.
- Note: Some Accounts may be listed more than once in the Linked Accounts tab, if they are linked to multiple Continuum sites. Each link can be removed separately.
OR use the quick option:
- In the Accounts window, find the Account you want to unlink.
- Go to Accounts > Tools > Remove Link between RangerMSP Record and Continuum.
- If the Account is linked to more than one site, ALL links will be removed.
Note: Removing the link between the Account and the Site in Continuum will also result in removing the links between the Account's tickets and assets to the ones in Continuum.
Link Asset to Device
In order for Tickets arriving from Continuum to be linked to the correct Asset, you must create an association between Devices in Continuum to Assets in RangerMSP, or create an Asset in RangerMSP for this Device.
Use the Continuum Links Manager Window to create the association:
- In the Assets Window, go to Assets > Tools > Continuum Links Manager.
- In the Wizard which opens you can find a list of available un-linked Devices from Continuum. This list gets updated every hour.
- Select the Device you want to link, and click Next. The following screen appears:
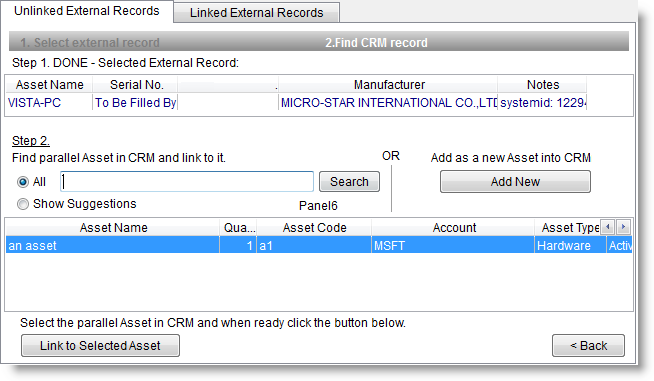
- Find Asset:
- Find the equivalent Asset using the search options:
- Search by name.
- See Assets recommended by the system based on the Device name.
- Once you have chosen the Asset, click Link to Asset.
- OR create a new Asset based on the Device details(*).
- Find the equivalent Asset using the search options:

(*) Note: When creating a new Asset in RangerMSP based on the Device from Continuum, the following fields are copied: Device Name, Serial Number and Manufacturer. Other technical device details are copied to the Asset Note field.
At this point the Asset and Device are linked.
To cancel the link between the Asset and Device, hit the Linked External Records tab to find the Asset and remove the link. See Unlink Asset From Device.
Unlink Asset From Device
Assets in RangerMSP must be linked to Sites in Continuum in order for Tickets to be linked to the correct Asset. If you want to cancel a link between an Asset and a Device, you can use two methods:
Use the Continuum Links Manager (recommended! this way you can see the linked Site details before removing the link):
- In the Asset Window, go to Assets > Tools > Continuum Links Manager.
- In the Window which opens hit the Linked External Records tab to find Assets which are already linked.
- This tab displays a list of linked Assets in RangerMSP and displays the linked Device details in the bottom pane. This list gets updated every hour.
- Select the Asset you want to unlink, and click Remove Link.
OR use the quick option:
- In the Assets window, find the Asset you want to unlink.
- Go to Assets > Tools > Remove Link between RangerMSP record and Continuum.
Ticket Creation – Special Cases
In case the Site or Device is not linked to the equivalent Account and Asset in RangerMSP, the Ticket will still be created, and the missing entity will be handled by the system in the following manner:

Ticket from Unknown Site
In case a Ticket arrives from Continuum for an anonymous Site which is not linked to any Account in RangerMSP, a new Account is automatically created with the name:
[Continuum AUTO CREATED] + Site name in Continuum.
For example, a Ticket which is created in Continuum for a site called "ACME company", the Account which is automatically created for this site will be called:
[Continuum AUTO CREATED] + ACME company
If such an Account already exists in RangerMSP (from previous tickets), the new Account will still be created, so multiple Accounts with the same name may exist in the system.
The Ticket is then created and linked to this automatically created Account. New Continuum Tickets will also be linked to this Account as long as a permanent Account is not created for this Site.
When technicians find this Ticket, they should:
- If a "real" Account already exists for this site, merge both Accounts to the master RangerMSP account for this site.
- If this site is new and does not exist in RangerMSP, make this the master Account for this site, and rename it to its real name.
- After the merge, all links to Continuum Sites will be merged into the Master Account so there is no need to re-link the Account to the Site.

Device Not Linked to Asset
In case a Ticket arrives from Continuum and is linked to a Device which is not linked to any Asset in RangerMSP:
- The Ticket is created and linked to Account.
- Device details are filled in the Ticket Description.
Tickets without a Site
In Continuum, manual Tickets can be unrelated to any specific customer site (e.g. a support Ticket against Continuum NOC Support). In this case, the Ticket which arrives at RangerMSP is not linked to a Site.
In case the Ticket is not linked to a Site, the Ticket is created and linked to the your own business’ Account, i.e. the first Account created in RangerMSP which represents your own business.
Troubleshooting
In case CRM RMM Server fails to download Sites and Devices details, the system will show the user a message when opening the Continuum Links Manager (e.g. from Accounts > Tools > Open Continuum Links Manager).
First, make sure all setup and installation steps were performed properly:
- Initialize Continuum PSG.
- Install CRM RMM Server.
- Validate CRM RMM Server downloads Continuum Sites and Devices to the RangerMSP server.
See full details in RangerMSP Setup.
If all steps were completed, it is possible the CRM RMM Server has failed to pull the files due to an error. To check this please log into RangerMSP client and from the menu select Tools > System Tools > Advanced > Check for Server Side Error Reports.
If no error file exists at this location, please contact RangerMSP Support for further assistance.
After the initial setup, to start working with the Continuum Link, you should complete the following steps:
- Link Accounts and Assets in RangerMSP to Sites in and Devices Continuum.
- Enable Continuum Integration.
See full details in RangerMSP Setup.
RangerMSP Privileges
In order for a user to manage Continuum Links (with Sites and Devices) the user should have Continuum Integration Privileges.
User without privilege for Continuum will not be able to link and unlink Continuum Sites, Devices and Tickets. The user will be able to view the Continuum Links Management Window in order to see the unlinked and linked Sites and Devices, however, the window will open for read-only purpose.
To give a user the ability to update links, they need to have the Continuum Integration Privilege:
- Find the user's Privileges Group from the Employee's window > Employee Tab.
- Then check that the Privileges Group includes the Continuum Privilege:
- Go to File > Users & Privileges > Privileges.
- Choose the relevant group from the drop down menu and make sure that the Continuum Integration privilege is selected.
