Quotes
Introduction
Quotes in RangerMSP provide an easy way to define and create sales quotes and proposals for products and services, using your Items list.
Your Items list can be imported from QuickBooks or from other sources such as Excel spreadsheets, text files, and more.
Customers can view Quotes using the RangerMSP Web Interface, and print out their own copy via the Web. You can also customize Quotes layout to make sure it provides exactly the information you want it to.
The Quotes are linked to RangerMSP Accounts, so each Quote is automatically attached to the correct customer, keeping the complete history in the Account’s view.
Contents
- 1 Introduction
- 2 Quote Life-cycle
- 3 Quote Window
- 4 Working with Quotes
- 4.1 Create New Quote
- 4.2 Link Quote to existing Ticket/Asset/Contract/Opportunity
- 4.3 Using Taxes in Quotes
- 4.4 Add Item-Based Lines
- 4.5 Add Textual and Blank Lines
- 4.6 Make Quote Public
- 4.7 Converting Won Quotes
- 4.8 Convert Quote Lines to Charges
- 4.9 Convert Quote to Ticket
- 4.10 Convert Quote to Contract
- 4.11 Convert Quote Lines to Invoice
- 4.12 Search For Quotes
- 4.13 Copy Quote
- 4.14 Delete Quote
- 4.15 Refresh & Recalculate Taxes
- 5 Reports
- 6 Quote Options
- 7 Quotes Web Access
- 8 Privileges
- 9 Spell Checking
- 10 See Also
Quote Life-cycle
Each Quote has a Status indicating what is happening with this Quote. Possible Statuses are:
- Open
- Lost
- Accepted by Web (by Customer via Web Interface)
- Won
Only an Open Quote can be updated. All Status changes are recorded in the Quote’s Audit tab.

When a Quote is first created, it is in status Open. It can then be modified in one of the following ways:
- Lost:
Technician can change the Quote status to Lost, meaning the Quote was not accepted by the customer and will not be executed. - Accepted by Web:
Quotes that are marked as Public can be accessed and accepted by the customer via the Customers Web Interface. The customer can accept the Quote, which then becomes Accepted by Web. Note that this Quote is not considered won until it is updated by a technician to status Won. - Won:
Technician can change the Quote to Won, either from status Open or from status Accepted by Web. The Quote can then be converted to a Charges, Ticket, or QuickBooks Invoices - see Converting Quote to Charges.
See more details about what each status means in Quote Status.
Quote Window
When opening the Quote window, the Quotes list is displayed. In this window you can search for a Quote using the search panel at the top part of the window and view the results in the list. See Searching For Quotes for more details.
Double-clicking a Quote opens the full Quote details window:

In this window you can find all the Quote information including:
See more details in the sections below.
Quote Status
Each Quote can be in one of the following statuses:
- Open
- Lost
- Accepted by Web
- Won
Status Open
The Open status means the Quote is in progress and can still be modified. The Quote lines can be updated, affecting the Quote price and total amount, together with other Quote details. An Open Quote can become either Won or Lost. If updated by the customer, it can also become “Accepted by Web”, however, it still requires a technician to explicitly change the status to Won in order for the Quote to be won.
Status Lost
In this status, the Quote details cannot be modified, and most of the Quote tabs become read-only. Quote Properties, which are internal details about the Quote, can still be updated. When a Quote is Lost it cannot be converted to Charges, Ticket or Invoice, however, it can be changed back to Open for further work if needed.
Status Accepted by Web
While a Quote is open, technicians can make it Public, so privileged customers can access the Quote, view the details and accept it. Once a Quote is accepted by the customer, it becomes “Accepted by Web” and most of the Quote tabs become read-only. Quote Properties, which are internal details about the Quote can still be updated.
At this status, technicians can change the Quote status to Won, and convert it to Charges, Ticket or Invoice.
Should one need to update any of the Quote details at this point, technicians can change the Quote back to Open, clearing the “Accepted by Web” status. All of the status changes are logged in the Quote Audit tab for full tracking of it’s life-cycle.
Status Won
Once a Quote is approved by the customer (either via the Customer Portal or in any other way), technicians should change it’s status to Won.
When a Quote is Won most of the Quote tabs become read-only and cannot be modified. Quote Properties, which are internal details about the Quote can still be updated.
At this status, technicians can convert the Quote to Charges/Invoice, based on the Quote lines.
Lines Tab
The Quote Lines tab is where you add Items to your Quote. Each line represents a product or service, or can be a plain-text line which helps you structure your Quote better.
Adding new lines is done via the options at the top part of the tab, including: Item, Textual Lines, Blank Line or using quick-add options. See more details in Add Item-Based Lines.
The Quote total amount appears at the bottom-right corner of the tab. When using RangerMSP Taxes, the total amount shows also the Tax calculation (see Using Taxes in Quotes for more details).
On the right part of the list appear control buttons which allow you to move lines up or down in the Quote, and also edit and copy a line (these options are also available when right-clicking a line).
General Tab
Under the General tab you will find:

- Account
Each Quote must be linked to an Account. All quotes which are linked to a specific Account can be viewed from the Account’s Quotes tab.
- Bill To
The contact and address details for billing. These details are taken from the linked Account by default and will be used when printing the Quote and when converting it to an Invoice. - Ship To (optional)
The contact and address details for shipping. These details are optional and are needed only in cases the package needs to be shipped to another address than the Bill To address. This field will be used when printing the Quote and when converting it to an Invoice. - Contract (optional)
Each Quote can be linked to a Contract. Use Contracts for Quotes when you want to use specific Custom Pricing or override the Account’s Custom Pricing. When using a Contract for the Quote, the Item’s price is taken based on the Custom Pricing defined for the Contract. If no Contract is selected for the Quote, the Item’s price is taken from the Item’s settings, or from the Account’s Custom Pricing (if defined).
|
Audit Tab
The Audit tab is where you can track what happened with this Quote from its creation.
The system automatically logs actions performed on the Quote under this tab, including:
- Quote creation
- Status updates
- Customer Web access to the Quote, including when a customer views and prints the Quote or when a customer accepts the Quote.
- Quote being converted to Charges, Ticket or Invoice
- Quote being marked as Public or Not-Public
Properties Tab
In the Properties tab the system keeps internal properties for the Quote, which are accessible only for Employees. Customers do not have access to this information via the Customers Web Interface.
Properties do not include any financial information regarding the Quote, and can be updated even when the Quote is approved and locked for updates.

Quote Properties include:
- Name
An internal name for the Quote. Use it to provide a short description of the Quote. This field is displayed in Quote lists, including the Quotes tab under the Account window. - Reference
The Reference field is an optional additional identification for the Quote (the main ID is the Quote Number).If defined, the reference field must be unique. - Manager
The Employee in charge of this Quote. By default, the Employee creating the Quote is the Manager, unless specifically specifying another employee. - Custom Fields
Field1-Field3 are optional custom fields which can be renamed to be used for your own needs. - Public flag
The Public flag determines whether a Quote is accessible to customers (who have the appropriate privileges) via the Customers Web Interface. By default, a Quote is not Public unless explicitly set as Public. - Quote downloadable format
Customer users who access the Quote via the Web Interface can print out the Quote. By default, the format which will be printed is determined from Tools > Options > Quotes and refers to all Quotes. Using this option in the Quote will override the default report format and will determine which specific format will be printed for this Quote by the customer. - Notes (Internal)
In the notes field you can keep internal notes regarding this Quote.
Working with Quotes
Create New Quote
New Quotes can be added from the Account, Ticket, Asset, Contract or Opportunity windows using Quotes tab.
To create a new Quote:
- If you want to include Taxes in your Quotes, make sure Taxes are defined for the Accounts and Items - see Using Taxes in Quotes for more details.
- Open the main Quotes Window.
- Click New at the toolbar.
- Add the Quote lines in the Lines tab - see Add Item-Based Lines and Add Textual and Blank Lines for more details.
- Click the General tab and choose the Account which is linked to the Quote. See more details in General Tab > Account Details.
Note: It is possible to start the new quote creation process from the Account,Ticket, Asset, Contract or Opportunity window, via the Quotes tab, and this will automatically fill-in the Account details in the Quote. - If needed - add Ship to address or load it from any existing Account
- Choose a Contract in case it is required - see more details in General Tab > Contract.
At this point, the Quote contains the essential details required for it. In addition you can add the following details:
- In the Header & Footer tab, you can add the Header and Footer text which will be displayed in Quote reports at the beginning and the end of the report. This text also appears in the Web Page displaying the Quote to the customer when using the Web
- In the Properties, you can add more internal details about the Quote - see Properties Tab.
Link Quote to existing Ticket/Asset/Contract/Opportunity
A Quote can be linked to existing Ticket/Asset/Contract/Opportunity of the same Account using an arrow at the top right side of the Quote details Window. The Quote then will be listed under the selected record.

Using Taxes in Quotes
Using Taxes in RangerMSP is optional. If no Taxes are defined, the total amounts will be displayed with no Tax calculation.
If you want to include Taxes in your Quotes, you must make sure to define the Tax both for the Account and for each Item being used in the Quote. Once the taxes are defined properly, these settings automatically affect the Quote items and totals.


When Taxes are defined for the Account and Item, Quote total amount including Taxes is displayed in:
- Application Windows, including Quote totals.
- Printed reports.
- RangerMSP Web Interface
Refresh Tax Rates
Note that if you update Tax rates in the application, both for the Account or Item Tax settings, you should refresh the Quote to apply the new rates/settings. See Refresh & Recalculate Taxes for more details.
For complete instructions on how to define and use Taxes in RangerMSP, refer to Charging Using Taxes.
Add Item-Based Lines
Use the Lines tab in the Quote window to add item-based lines to the Quote. The Items must already have been setup in the application before they can be used in Quotes.
The top part of the tab is where you add Items to the quote using the Add Item or the Quick Add Items options.
Add Item (Using New Quote Line Window)
To add Item Lines:
- Click Add > Item (link). The New Quote Line window opens.
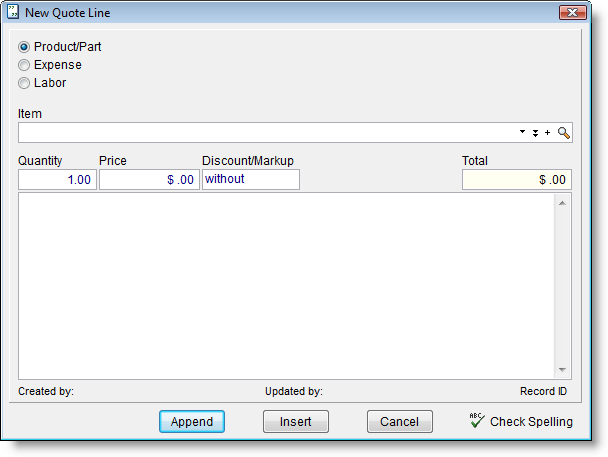
- Select which item group you want to use: Product/Part, Expense or Labor.
- Choose the Item from the drop-down list in the Item field.
- Set the price for the Item line. Items can be unit-based or hourly-based. The price is taken from the Item’s settings:
- For unit-based items, the price is copied to the Item line’s Rate field from the item’s fixed-price settings.
- For hourly-based items:
- If the hourly-based item has a fixed-price, this price will be copied to the Item line’s rate field.
- If the hourly-based item has a “By Employee” rate, the rate is automatically taken from the current logged-in employee’s settings. The rate can be taken from another’s employees settings by clicking the arrow next to the Rate label (see screenshot below).
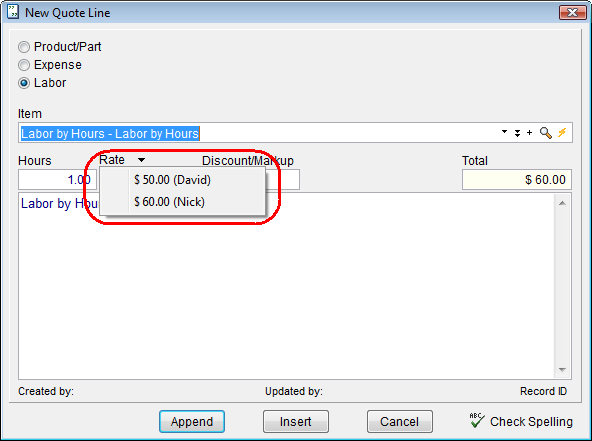
- Note: Each Quote line represents a service or product which is offered to the customer, and when converted later to Charges, they should reflect a purchase of a service, without reflecting a specific Employee’s charges. See more details in Using Hourly-Based Items in Quotes.
- Set discount or markup (optional):
- Next to the price, choose Discount or Markup as required.
- Choose whether to use percentage or a fixed amount.
- Enter the discount or markup amount.
- Note that discounts will be printed in reports. Markups on the other hand are never printed in reports and can only be viewed when editing the Quote Line.
- Click Append or Insert to add the line to the Quote.


Quick Add Item
To quickly add item lines without opening the New Quote Line window:
- Click the Quick Add label to choose the Item Group you want to add (Product/Part, Expense, Labor).
- Choose the Item from the drop-down list.
- Done. You now have a new Item line in the Quote.
- You can then double-click this line to edit it and refine its properties.
For more details on the new quote line properties see Add Item (Using New Quote Line Window).
Using Hourly-Based Items in Quotes
Items in RangerMSP can have a fixed-price or an hourly-based rate.
Adding hourly-based Items to Quotes, will result in hourly-based Charges later on, when converting the Quote to Charges.
When creating a Charge from a Quote line, this Charge should represent a service being offered to the customer, rather than actual work performed. Assigning an employee to these Charges will affect the employee's charged hours as if the work had already been performed.
Best Practice
When converting a Quote to hourly-based Charges, by default, the charge is not assigned to any Employee. It is recommended to leave the employee empty, thus billing the customer for the time without logging it under a specific employee.
The Charge can be updated later on with the Employee that actually performed the work, or, alternatively, the work can be logged separately as internal (not-billable) work.
To leave the Charge un-assigned to an employee, use the Do Not assign Employee to hourly-based Charges flag when converting the Quote to Charges. See screenshot below.

Add Textual and Blank Lines
Adding textual (plain-text) and blank lines to the Quote helps you design it to fit the specific customer’s requirements and needs. You can add explanation lines, separators lines, etc. to make the Quote more readable and clear.
Adding lines is done from the Lines tab, using the options at the top part of the tab:
- To add text lines click the Add > Textual Line option.
- To insert blank lines above the selected row, click the Add > Blank Line option.
Tip: These options are available from the right-click pop-up menu.
You can also use keyboard shortcuts to add: New item – F4, Textual line – F5, Blank line – F6.
Make Quote Public
Making the Quote Public means that privileged customers can see, print and accept this Quote via the Web Interface.
By default, the Quote is not Public and must be explicitly marked as Public in order for the customer to be able to see it.
See more details in Customer Access to Quotes.
Converting Won Quotes
After a Quote is accepted and set as Won, it can be converted into billable charges in order to bill the customer for the items.
Quotes can be converted to:
- Charges
This option will create a Charge for each Item line in the Quote, and will mark it as billable or not depending on whether the Quote is linked to a Contract or not (see Convert Quote Lines to Charges). - Ticket
This option will create a Ticket based on the Quote details, and Charges that are automatically linked to the Ticket, based on the Quote lines. See Convert Quote to Ticket. - Contract
This option will create a Contract based on the Quote details. All Quote Lines will be automatically converted into Contract-Price Charges, and linked to the Contract. See Convert Quote to Contract. - QuickBooks Invoice
To create an Invoice in QuickBooks for the Quote see Quote Lines to Invoice.
Convert Quote Lines to Charges
To convert a Quote into Charges:
- Set the Quote as Won using the statuses bar at the top.
- Once the Quote is Won, the Convert To menu becomes active. From the Convert To menu Choose > Charges...
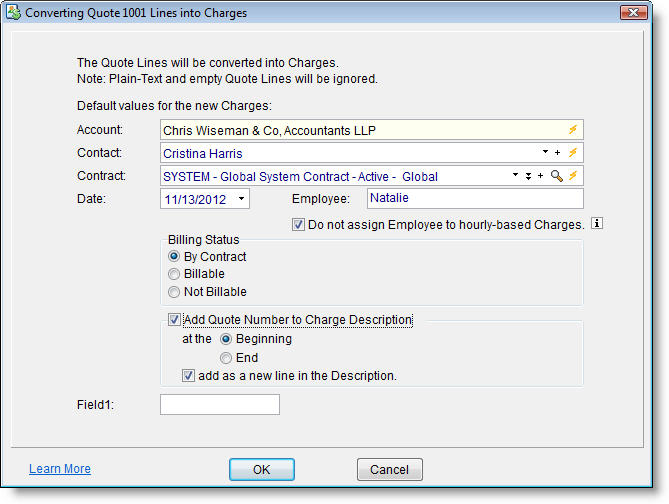
- In the Convert Quote into Charge window which opens you should set details which will be used for each of the Charges which will be created:
- Contact - the Contact which will be assigned to all Charges.
- Contract - If the Quote has a Contract defined for it, then this Contract is selected by default for all Charges.
- Date - the Date which will be used in the Charge.
- Employee - here you can choose an employee that will be assigned to the Charges. By default the Charges are not assigned to any employee, which is the recommended way to create the Charges. See more details in Using Hourly Based-Items in Quotes for more details.
- Do Not assign Employee to hourly-based Charges - If you assigned the Charges to an employee (by choosing an employee above), it is recommended to set this flag in order to leave hourly-based charges unassigned, thus billing the customer for the time without logging it under a specific employee. See Using Hourly Based-Items in Quotes for more details.
- Billing Status - this option determines the way the Billing flag of the Charge will be defined. The default behavior it to use the Contract’s settings (e.g. set all Charges as Not-Billable for a Block-Of-Money Contract, see more details in billable flag behavior). You can override the Contract behavior rules by setting this flag to either “Billable” or “Not Billable” which will affect all Charges which will be created from this Quote.
- Add Quote Number to Charge Description - will add the number of the Quote at the beginning or the end of the Charge description, as selected.
- Select Add as New Line to add the Quote number as a separate line in the Charge description.

All Charges which will be created for this Quote, can be viewed by clicking the Show... link next to the Converted To Charges status extension at the top part of the Quote window.
Convert Quote to Ticket
After a Quote is accepted and set as Won, it can be converted into a Ticket (starting in RangerMSP 6.0). This will also create Charges from the Quote lines and automatically link them to the Ticket. Converting a Quote to a Ticket creates the Charges in RangerMSP according to the Contract linked to the Quote (see Quote Contract). Then the Ticket is created and all billable Charges are linked to the Ticket.
To convert a Quote into a Ticket:
- Set the Quote as Won using the statuses bar at the top.
- Once the Quote is Won, the Convert To menu becomes active. Choose Convert To > Ticket...
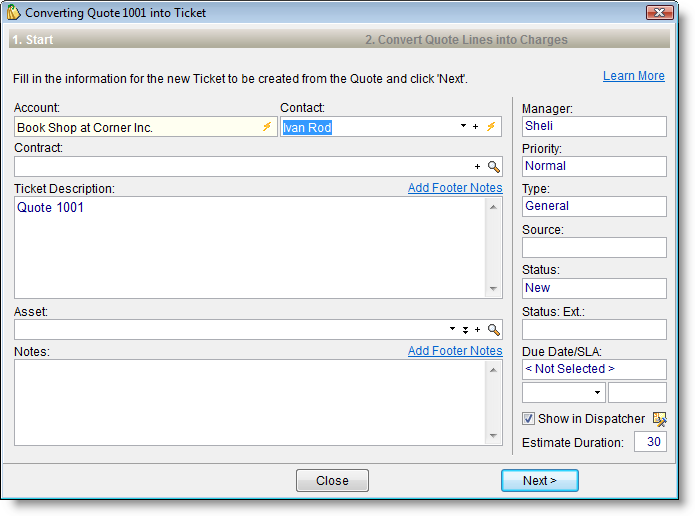
- In the Converting Quote into Ticket wizard that opens, review the details. You can select an Asset, add notes and description, set status, priority and much more for the new Ticket. Enter the details and click Next.
- In the Convert Quote Lines into Charges step that opens you should set details which will be used for each of the Charges that will be created:

- Contact - the Contact that will be assigned to all Charges.
- Contract - if the Quote has a Contract defined for it, then this Contract is selected by default to be attached to all Charges.
- Date - the Date that will be used in the Charge.
- Employee - here you can choose an employee that will be assigned to the Charges. By default the Charges are not assigned to any employee, which is the recommended way to create the Charges. See more details in Using Hourly Based-Items in Quotes for more details.
- Do Not assign Employee to hourly-based Charges - If you assigned the Charges to an employee (by choosing an employee above), it is recommended to set this flag in order to leave hourly-based charges unassigned, thus billing the customer for the time without logging it under a specific employee. See Using Hourly Based-Items in Quotes for more details.
- Billing Status - this option determines the way the Billing flag of the Charge will be defined. The default behavior it to use the Contract’s settings (e.g. set all Charges as Not-Billable for a Block-Of-Money Contract, see more details in billable flag behavior). You can override the Contract behavior rules by setting this flag to either “Billable” or “Not Billable” which will affect all Charges that will be created from this Quote.
- Add Quote Number to Charge Description - will add the number of the Quote at the beginning or the end of the Charge description, as selected.
- Select Add as New Line to add the Quote number as a separate line in the Charge description. All Charges which will be created for this Quote, will be linked to the Invoice reference number and can be displayed from the Account's Charges tab or when searching for Charges by Invoice Reference number (Charges Window > QuickBooks Icon > Filter by Invoice Reference).
- Click Create Ticket & Charges to finalize the operation.


The newly created Ticket will open, and Charges can be viewed in the Charges tab.
Convert Quote to Contract
Note - this feature is available from RangerMSP version 6.1 and higher.
After a Quote is accepted and set as Won, it can be converted into a Contract (starting in RangerMSP 6.1). This action also creates Contract-Price Charges from the Quote lines and automatically links them to the Contract.
The Contract type affects the details taken from the Quote in the following cases:
- For Block of Time Contracts, the total hours quoted in the hourly-based lines is taken as the initial block of time.
- For Block of Money Contracts, The Quote total, before taxes, becomes the Contract’s initial block of money amount. See more details below.
To convert a Quote into a Contract:
- Set the Quote as Won using the statuses bar at the top.
- Once the Quote is Won, the Convert To menu becomes active. Choose Convert To > Contract...
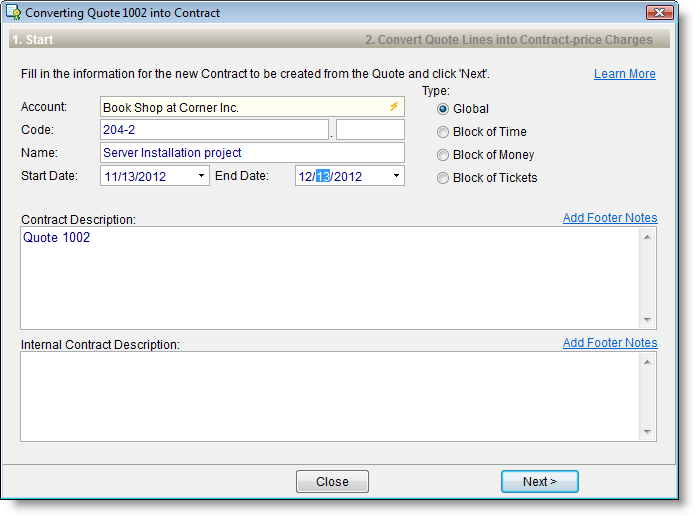
- In the Converting Quote into Contract wizard that opens:
- Enter Contract Code, Contract Name and Contract End Date.
- Optionally update the Contract Description and Internal Contract Description.
- Choose The Contract Type. The Contract type may affect the contract in the following cases:
- When selecting Block of Time, the total hours quoted in the hourly-based lines is taken as the initial block of time. This default amount can be modified at this step or later on.
- When selecting Block of Money, the Quote total, before taxes, becomes the Contract’s initial block of money amount. This default amount can be modified at this step or later on.
- Click Next to move on to the next step.
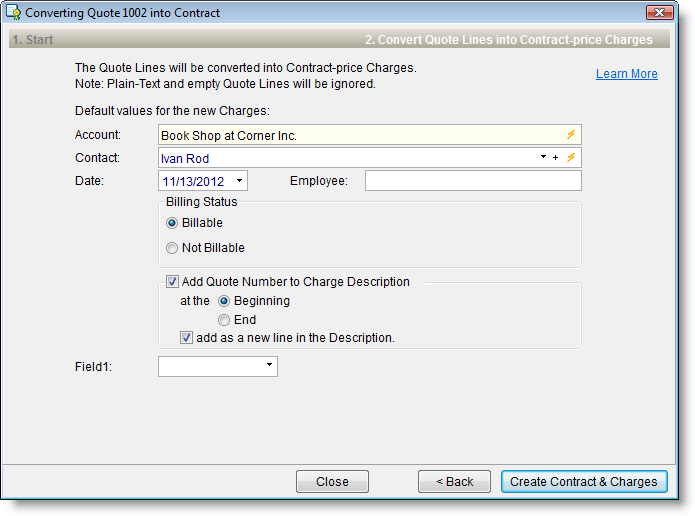
- In the Convert Quote Lines into Contract-Price Charges step that opens, you should set details which will be used for each of the Contract-Price Charges that will be created:
- Account and Contact - the Contact that will be assigned to all Contract-Price Charges.
- Date - the Date that will be used in the Contract-Price Charge.
- Employee - here you can choose an employee that will be assigned to the Contract-Price Charges. By default the Contract-Price Charges are not assigned to any employee, which is the recommended way to create the Contract-Price Charges. In any case assigning an employee to the Contract-Price Charge will not affect the total working hours amount of the employee.
- Billing Status - this option determines the way the Billing flag of the Contract-Price Charge will be defined. The default behavior is “Billable”, assuming the Contract-Price Charges should be billed to the customer. All Contract-Price Charges can be set as “Not Billable”.
- Add Quote Number to Charge Description - will add the number of the Quote at the beginning or the end of the Contract-Price Charge description, as selected.
- Select Add as New Line - to add the Quote number as a separate line in the Contract-Price Charge description. All Charges which will be created for this Quote, will be linked to the Invoice reference number and can be displayed from the Account's Contract-Price Charges tab or when searching for Charges by Invoice Reference number (Charges Window > QuickBooks Icon > Filter by Invoice Reference).
- Click Create Contract & Charges to finalize the operation.


The newly created Contract will open, and Contract-Price Charges can be viewed in the Contract-Price Charges tab.
Note: In some cases you may want to convert the Contract-Price Charges to regular charges, if you want to renew the contract and you don’t want these Charges copied to the new Contract. See Converting Contract-Price Charge to a Regular Charge for more details.
Convert Quote Lines to Invoice
After a Quote is accepted and set as Won, it can be converted into billable charges which will be included in a QuickBooks Invoice.
Converting a Quote to an Invoice creates the Charges in RangerMSP according to the Contract linked to the Quote (see Quote Contract). Then the Invoice is created in QuickBooks and all billable Charges are marked as Billed automatically.
To convert a Quote into an invoice:
- Set the Quote as Won using the statuses bar at the top.
- Once the Quote is Won, the Convert To menu becomes active. From the Convert To menu Choose > QuickBooks Invoice...
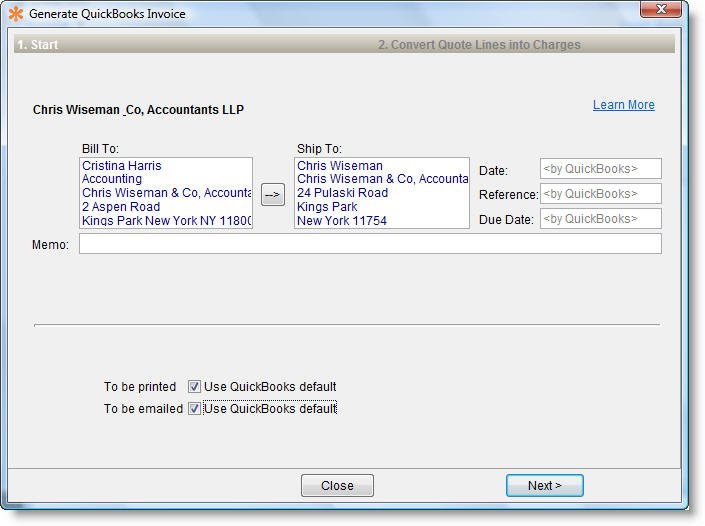
- In the Generate QuickBooks Invoice wizard which opens review the details and click Next to generate the Invoice.

All Charges which will be created for this Quote, will be linked to the Invoice reference number and can be displayed from the Account's Charges tab or when searching for Charges by Invoice Reference number (Charges Window > QuickBooks Icon > Filter by Invoice Reference).
Search For Quotes
The Search panel provides advanced search options:
- By Quote fields
Choose a field from the drop-down list and enter the search text in the text box. Click Refresh to view the result list. - Quick filtering by Status
Using the quick check-boxes selection you can easily filter by status (on top of the search above). You can determine the default filtering for this window from Tools > Options > Quotes. See Quote Status for more details about the different Quote Statuses.
Copy Quote
Copying a Quote will copy the Quote lines, Header and Footer and Quote Properties (Reference, Public and Downloadable Report format are not copied). Other details should be added manually after copying the Quote.
To Copy a Quote:
- Open the Quotes Window
- Select the Quote you want to copy.
- Click Copy icon in the toolbar.
Delete Quote
Deleting a Quote will delete the Quote itself together with all the Quote lines.
To delete a Quote:
- Open the Quote window
- From the main Quotes menu, select Quotes > Delete.
Note: If a Quote has already been converted to Charges, Ticket or Invoice, it cannot be deleted.
Refresh & Recalculate Taxes
Starting with RangerMSP 6.0, a new option was added to the Quotes allowing to refresh the Quote with new Tax settings and to recalculate the results. New settings may include updated Tax rates or updated Account or Item Tax settings.
The Refresh and Recalculate option goes over all Item Taxes, Account Taxes and Tax Rates for all Accounts and re-applies them to the Quote.
The option is available from the Quotes main menu > 'Refresh & Recalculate Taxes for Quote'.
Use the refresh and recalculate option whenever updating Tax rates or settings, to make sure you always use the most recent settings in your quotes. The option is applied only on Quotes in status Open.
Reports
Printing out a Quote can be done via the Quote window or from the Reports window. The system comes with a set of predefined reports for Quotes, which covers a few formats and data layouts. It is also possible to customize the reports, change their layout, add your logo, etc. You can find more details in Reports.
Quote reports will show the Quote amounts and totals. If you want to use Taxes in your reports, you must first define the taxes for the Accounts and Items being used in the Quote. See more details in Using Taxes in Quotes.
Quote Reports include:
- Detailed Quote information
The detailed reports are the customer-facing reports which can be printed out for the customer, listing the Quote lines, with prices, taxed (if used - see Using Taxes in Quotes for more details) and the total price. - Quote Lists
Quote list reports are intended for internal usage for employees to print out lists and analyze the Quote data.
Administrators can determine which report will be printed by default when clicking the Print icon in the Quote window. See more details in Quote Options.
Send quote as PDF by Email
Quote can be attached as PDF file to email using Quote email templates. See more details on creating and using email templates in Email Templates.
Customer-facing Reports
The Quote details reports are designed to be printed for customers. These reports include the following features:
- Ability to change terminology - it is possible to define an alternative word instead of “Quote” which will be used in reports and in the customers Web portal. See more details in Quote Options.
- Price for Customers - Customer-facing reports show the item price after adjustments (e.g. custom price, markup) without exposing the original price to the customer. Discounts on the other hand are shown in the report.
- Determine which report will be printed via Web portal - when choosing a default report in the Quote Options window, this determines which report will be printed when a customer clicks the “Print to PDF” link in the Quote Web page. It is possible to override this and choose a different report format for each Quote in the Quote’s Properties tab.
Quote Options
To manage Quote Options, go to Tools > Options > Quotes tab.

User Settings:
These settings will affect only the current user's settings.
- Filter Employees – Me/All - Determines the default filter for the Quotes list.
- Default Status Filtering - Determines the default filter by status for the Quotes list.
Global System settings (only for Administrators):
These settings will affect all users.
- Default Detailed Report - Here you choose the default report which is used when printing Quotes or when downloading a Quote as a PDF file via the Web Interface. Note that you can override these settings in the Quote level, via the Quote's Properties tab.
- The Quote Term as Seen by Customers - These settings allow you to use a different term instead of the word "Quote" with your customers. Here you set the customer-facing terms which are used in Reports and in the Customers Web Portal. Both the single and plural terms should be set.
- Increment Quote Number - System Administrators can change the Quote numbers being created and increment the automated Quote number to start from a non-sequential number.
For example: On January 1st you can increment the Quote numbering to the next 10,000 number so you’ll easily know, based on the Quote number, when it was created.
To increment the next Quote number, go to Tools > Options > Quotes and click Increment Quote Number.
Note that only System Administrators can perform this action, and, once it is performed, it is irreversible, so it should be performed carefully.
Quotes Web Access
In addition to managing Quotes using the RangerMSP client software, the RangerMSP Web Interface provides Web access to Quotes.
- Technicians Access
Technicians at customer sites can easily view Quote details, including the Quote lines, Audit, Status and other properties.
Using the Employee Web Interface, technicians can edit Quote Lines and update the Quote Status and Properties. More advanced options (e.g. Editing Quote lines or converting a Quote into Charges, Ticket or Invoice) are available only via the RangerMSP client.
- Customer Access
Customers with web access can optionally have access to their Quotes online. (Note that you can select not to show Quotes to customers.) See more details in Customer Access to Quotes.
Customer Access to Quotes
Customers Web Interface provides the following options for Quotes:
- View Quotes
- Print Quotes
- Accept Quotes (Privileged users only)
All customer actions are logged in the Quote Audit, which is available to employees only.
All customer activity regarding Quotes in the Web Interface is logged in the Quote Audit tab. If the customer views the Quote, even without accepting it, this is also logged in the Audit.
View quotes
Only Quotes which are marked as “Public” can be accessed by customers via the Web portal. See more details in Make Quote Public.
Print Quotes
Customers can download a printable PDF version of the Quote by clicking Download as PDF on the Quote page.
It is possible to determine which layout will be used for customers from Tools > Options > Quotes > Default Detailed Report. In addition a different report format can be selected for each Quote in the Quote’s Properties tab.
Note that the term “Quote” can be replaced in reports if you want to use different terminology when printing customer-facing reports. See more details in Quote Options.
Accept Quotes
Customers can accept a Quote, and sign their approval via the Web portal.
Approving a Quote will:
- Change the Quote Status to “Accepted by Web”
- Make the Quote read-only so it cannot be modified once accepted.
- Log the acceptance in the Quotes Audit with the user name, IP and other details of the user for future reference.
Note that accepting a Quote does not change its status to “Won”. Changing a Quote to status Won and further handling it can be done only by technicians. See more details in Quote Status.
To accept a Quote:
- Make sure the customer is privileged to accept Quotes.
- The customer should then log in to the Customer Portal using their customer Web user
- Click Quotes and find the relevant Quote. Click View to enter the Quote details page.
- Scroll down and click Proceed to Accept Quote.
- Enter the customer name, email and signature and click Accept.

Privileges
Quote privileges control who has access to Quotes, and who can update the Quote. Privileges are managed in the Employee and Customer levels as explained below.
Employee Privileges
In order for Employees to be able to create, edit and view Quotes they require the following privileges from File > Users and Privileges > Privileges:
- Quotes
Only employees with the Quotes privileges have access to the Quotes window. It is possible to control whether they have access for View, Edit or Delete actions. - Other Employees’ Quotes
Only employees with this privilege have access to Quotes assigned to other employees. If the employee does not have this privilege, they will have access only to their own Quotes, i.e. Quotes where they are assigned as the Manager.It is possible to control whether they have access for View, Edit or Delete actions
All privileges affect both the client application and the Web Interface.
See Employee Privileges for more details about assigning privilege groups to Employees.
Customer Privileges
Customers who have access to the Customer Web portal, can be allowed to view and accept Quotes via the Web.
To allow customers to access and accept Quotes use the following privilege from File > Users and Privileges > Customer Privileges - for Web User:
- View Quotes
Allows the user to view the Public Quotes linked to their Account. - Accept Quotes
Allows the user to accept a Quote if it was not accepted or Won yet. This Privilege requires the View Quotes privilege to be selected as well.
See more details about assigning privilege groups to customers in Customer Privileges.
Spell Checking
All text lines and Item lines in the Quote can be spell-checked by clicking the Check Spelling button in the edit window.